This is an old revision of the document!
Table of Contents
Shaker Touch 2
Protein vending machine
Everything you need to start, operate and maintain.

Electricity supply
The machine is designed to operate from a power grid with a voltage of 230 +5/-10V (for CIS and EU countries).
Peak power consumption (during beverage preparation, with the standard cooler turned on, average value) - up to 300 W/h.
Total power consumption per month (with the standard cooler turned on, average value) - 46 kW.
Control Panel
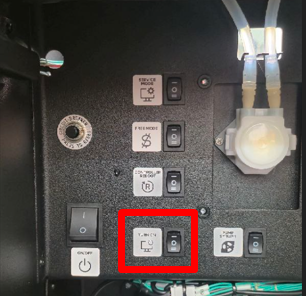
The control panel is located inside the machine, under the mixer shelf.

- Main power switch of the machine;
- Machine computer on/off button;
- SERVICE MODE button - opens the machine's service menu;
- FREE MODE button - turns on free mode for 15 minutes;
- CONTROLLER REBOOT button - reboots the application and the machine control board;
- Peristaltic pump priming buttons.
Preparation before launch
Before turning on the machine, follow these steps:
- Remove all shipping material and packaging;
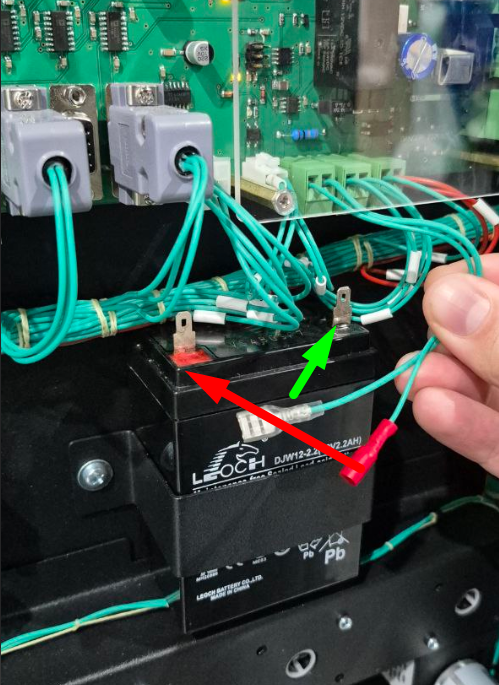
- Remove the back panel of the machine and connect the terminals to the UPS machine battery;
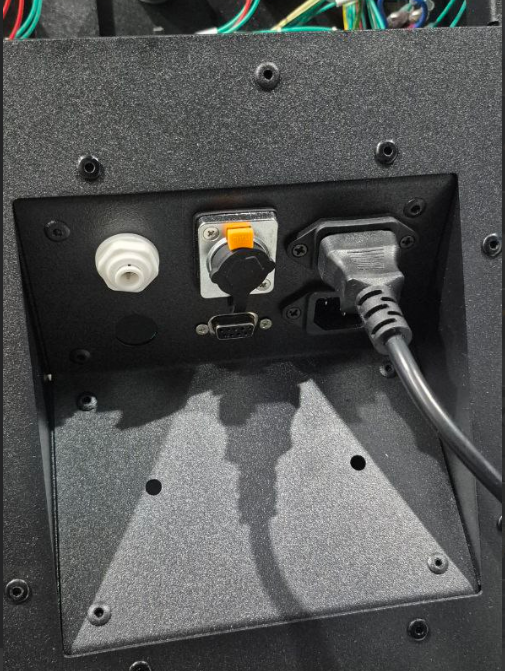
- Connect the 220V cable to the machine socket ;
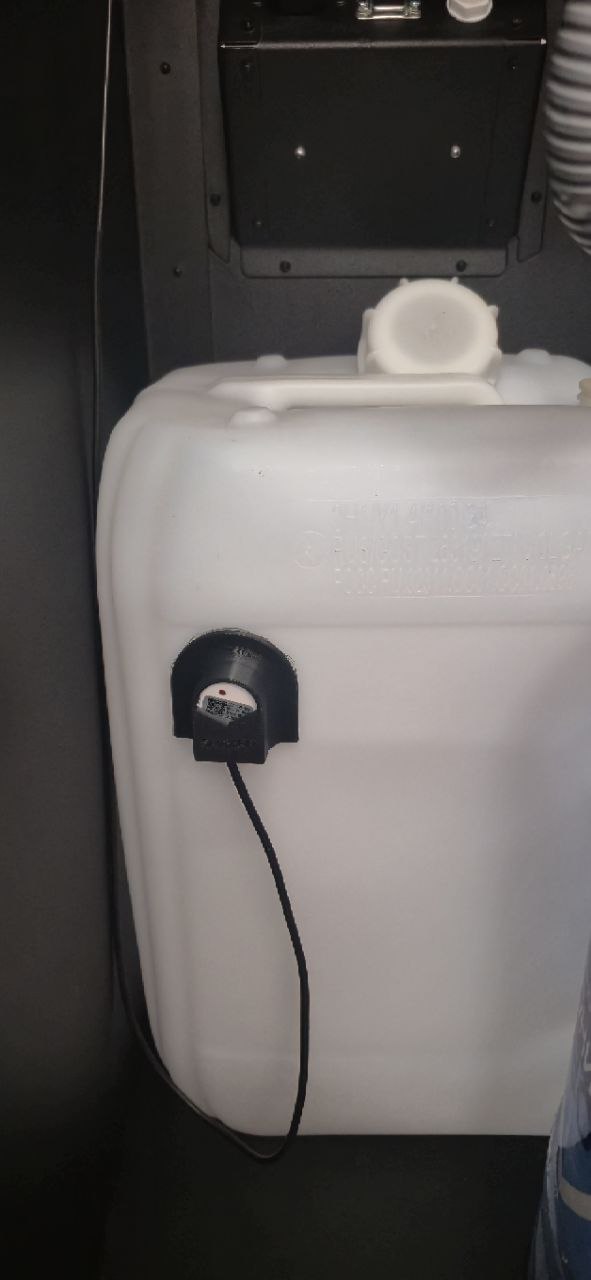
- Remove the protective film from the waste sensor mounting frame and stick it to the drain tank;
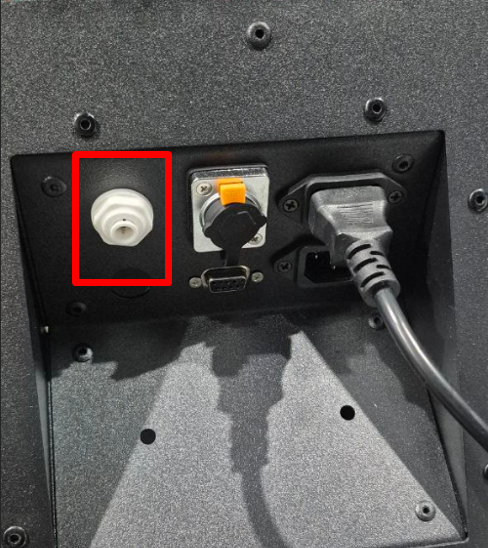
- If you choose to use water from an internal source, prepare a container with water. If you choose to use water from an external source, you need to install 3-5-cell filters and connect them to the inlet on the back of the machine using a 6mm PVC hose.
Turning the machine on, off, and rebooting
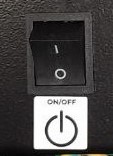
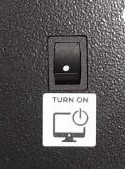
Turning on
On the control panel, turn the main power switch to the “ⅼ” position. When the “No signal” message appears on the screen, press the computer's on/off button.
Reboot
Rebooting the controller is used to clear errors. Press the CONTROLLER REBOOT button on the control panel.
To restart the vending machine, press the computer's on/off, button , then click Power Off on the screen. Wait until the computer turns off (the screen will go dark and the message “No signal” will appear), then press the computer's on/off button again.
Shutdown
Turning off the machine's power without first turning off the computer may result in data corruption and unstable operation of the machine.
Procedure:
- Press the computer's on/off button. Wait until the computer turns off (the screen will go dark and the message “No signal” will appear).
- Turn off the main power switch, by switching it to the “O” position.
Water supply
The machine's water treatment system has two water supply configurations:
 Connection to the central water supply system (external source).
 Connection to a water tank (internal source).
Machine operating modes
Paid mode
Enabled by default. Enabled after reboot using the CONTROLLER REBOOT button.
Free mode
Activate by pressing the FREE MODE button. A corresponding message will appear in the left corner of the screen. The device runs for 15 minutes, then switches to paid mode. It deactivates by rebooting with the CONTROLLER REBOOT button or by pressing the SERVICE MODE button.
Service mode
Activated by the SERVICE MODE button. Provides access to the machine's settings.
Connecting payment devices
Before installing payment devices, ensure they support MDB protocols. The device connector is located on the inside of the door.
Please confirm the configuration settings with the equipment supplier. The following settings are required:
- MDB protocol level = 3;
- Always Idle option (not pseudo, not emulation) = on;
- Ignore machine prices = off;
- Payment waiting time = 30 sec;
- Waiting time for product delivery before automatic return = 180 sec;
- Settings for starting, maximum credit, multiplier - optional, according to the currency used.
Loading powders
Procedure:
- Remove the food mixing device protective cover (if installed);
- Turn the container product feed chute to the upper position;
- Lift the front part of the container and remove it from the auger and auger drive motor connection;
- Pull the container towards you, remove it from the installation location, open the container lid; load the powder to the top level, check the tightening of the nuts.
- Close the container lid and install the container in its original place.
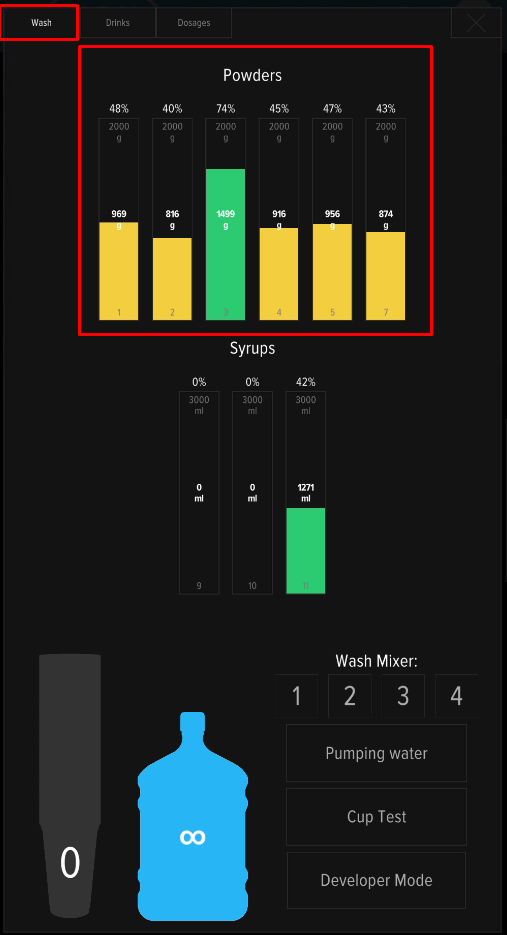
- In the service menu, set powders remaining values according to the container filling.

Connection of liquid concentrates
Rules and procedure for installing containers with concentrates:
- Place the connector on the valve and turn the knob on the connector clockwise until it stops. The red flags on the valve should move to the lower position and concentrate should flow into the hose;
- Pump the system using the PUMP SYRUP switches on the control panel until the concentrate comes out of the filling hoses.
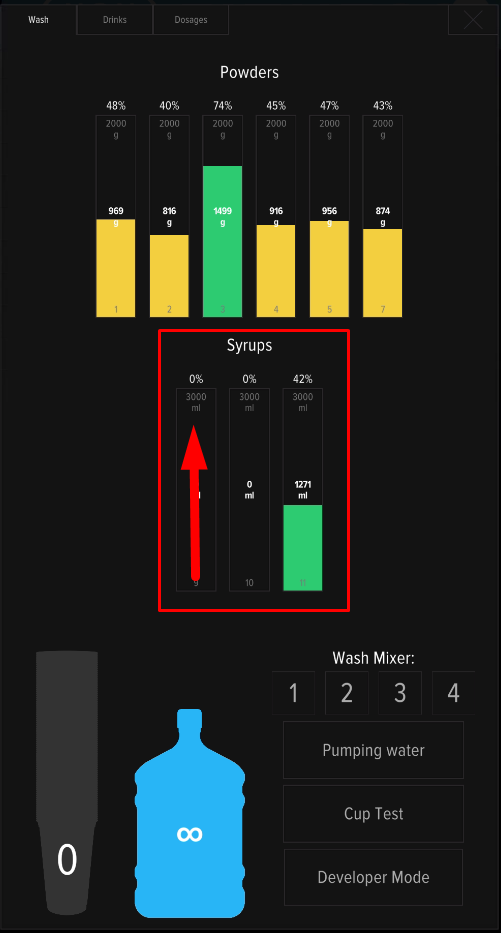
- In the service menu, set syrup remaining values according to the filling of the syrup container.
- Select the brand, line name and flavor in the machine's service menu.
- Calibrate the added drinks and adjust the dosages before launching them for sale.
Loading cups
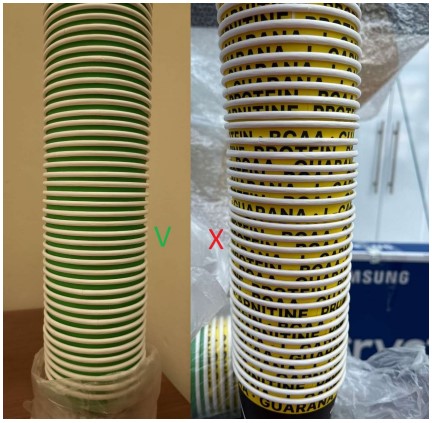
Requirements for glasses: diameter no more than 90 mm, height no more than 110 mm, volume up to 400 ml, material - paper (cardboard).
Red and black glasses, dented or deformed glasses, and plastic cups are prohibited. The distance between glasses in a stack must be uniform, from 4.3 mm to 8 mm.
Load the cups into the tube carefully, dividing it into 2-3 parts and holding it with your hand from below through the opening of the splitter. Do not compact the cups while loading.
The tube's capacity depends on the size of the glasses used and the spacing between them in the pack. When using 300 ml glasses with a spacing of 4-8 mm, the tube holds approximately 100 glasses.
If you use unsuitable cups or have problems dispensing cups, the message Error 5 No cup appears on the screen.
Important! The cup is separated by the weight of the stack, so the dispensing unit may stop dispensing cups when the quantity is low. Simply refill the dispenser with a new stack.
Customizing the range of flavors, setting prices and dosages for drinks
Customizing the range of flavors
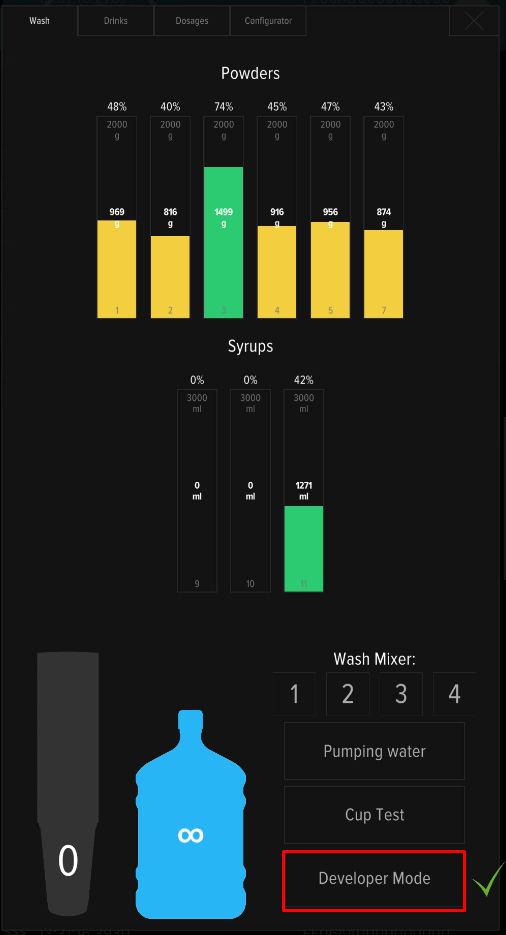
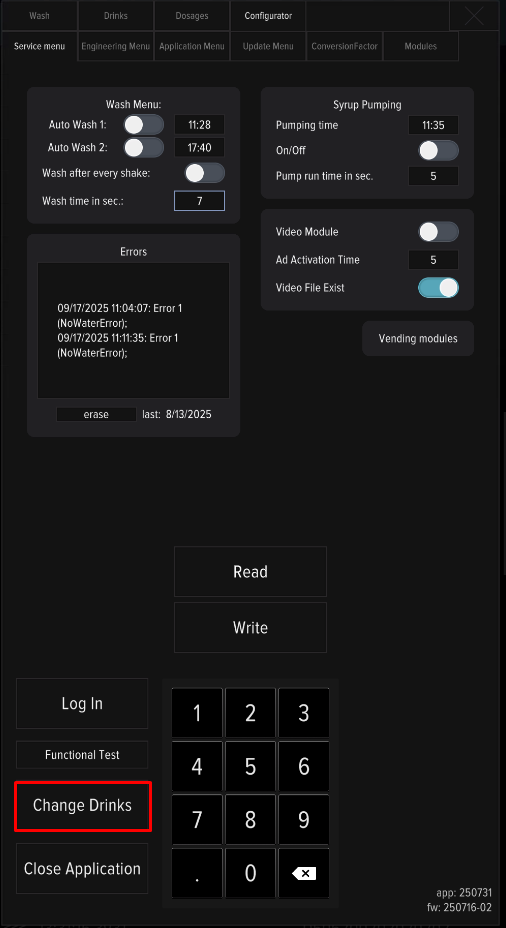
- press the SERVICE MODE button;
- on the first tab of the service menu, click the Developer mode button;
- go to the “Configurator” tab;
- On the “Configurator” tab, click the Change drink button;
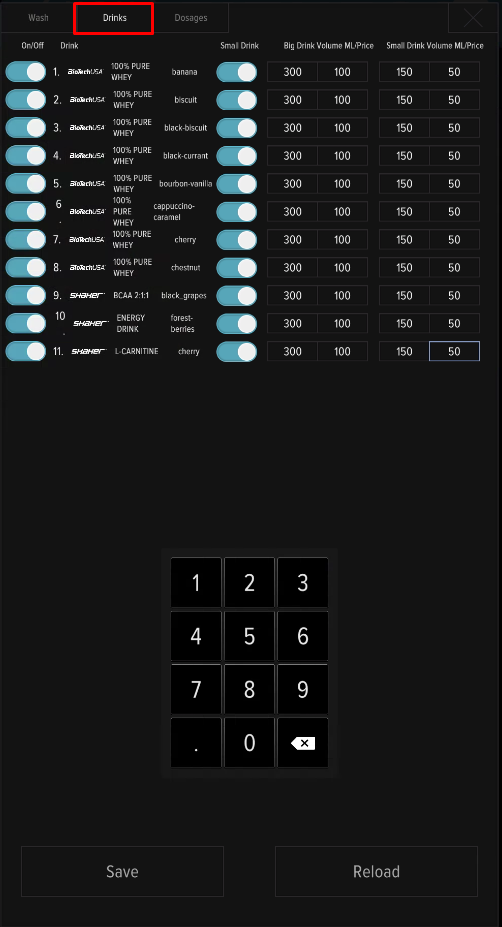
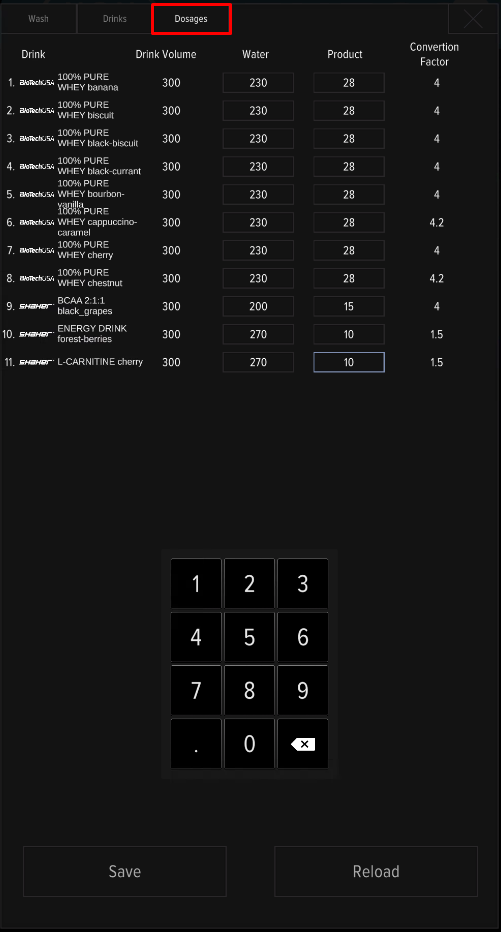
Containers inside the machine are counted from left to right and are numbered 1 through 8 on the product settings screen. Concentrates (syrups) are numbered 9-11(14).
Setting up prices and dosages
- Press the SERVICE MODE button;
- Go to the Drinks tab to set prices;
- Go to the Dosages tab to change the dosage;
- After setting the desired settings, click the “Save” button and close the menu.
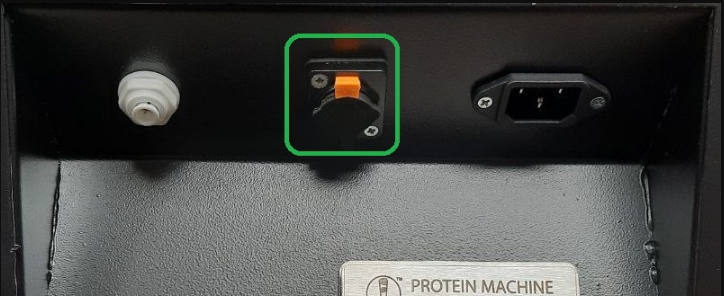
Internet connection
An internet connection is required for telemetry and remote connection to the machine. The following connections are used:
- Connecting the LAN cable from the router to the connector next to the power cable (does not require any settings).
- Connection to WiFi networks (basic option).
- Connecting mobile Internet (mobile modem).
Connecting to WiFi networks:
Connecting and operating Shaker telemetry
To set up and use telemetry, you need to register a user account and have a constant internet connection. For more information, see the article Authorization and Control of the Shaker Telemetry Machine.
Setting up a remote connection
Errors and solutions
Error 9 Manipulator Error (Touch 2)
Error 11: Output Window Curtain Error (Touch 2)
Error 21: Timeout for placing your shaker in the dispensing window (the machine will close the dispensing window and issue a refund if the window is empty for more than 15 seconds)
Error 22: The shaker in the dispensing window is too large (the height sensor is triggered; the machine will not start brewing until the shaker in the dispensing window is too large)
Question: Drinks disappear from the screen. After a reboot, they appear, but then immediately disappear.
Answer: Check remaining in the service menu. When the product balance reaches low levels (less than 5 servings), the machine removes the drink from the selection.
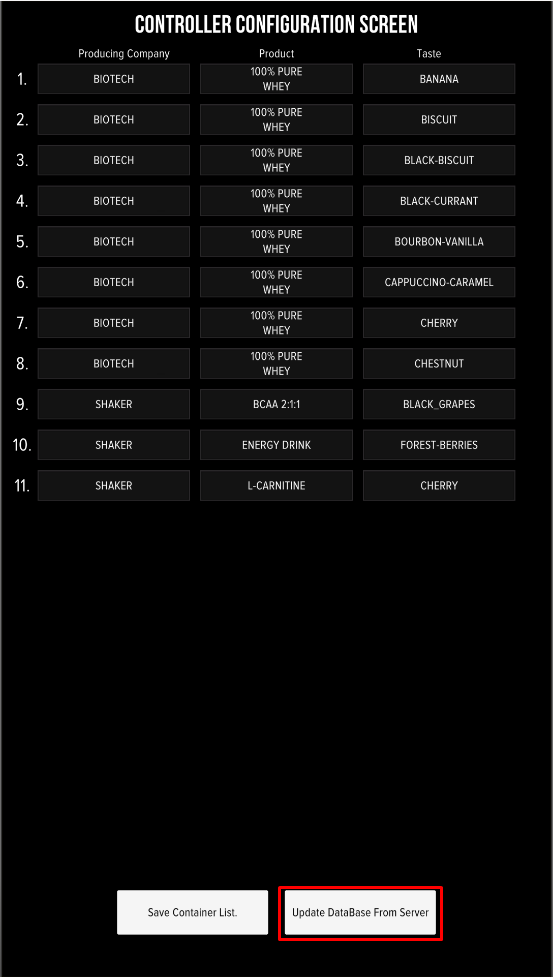
Question: The vending machine doesn't have the brand (flavor) I need in its settings. How do I add it?
Answer: If the vending machine is connected to telemetry, click "Update database from server", on the flavor setup screen , then check the list. If the desired product is not available, please submit a request to technical support. Important! Rendering media files (logos, flavor images) is a paid service. For details, please contact technical support.
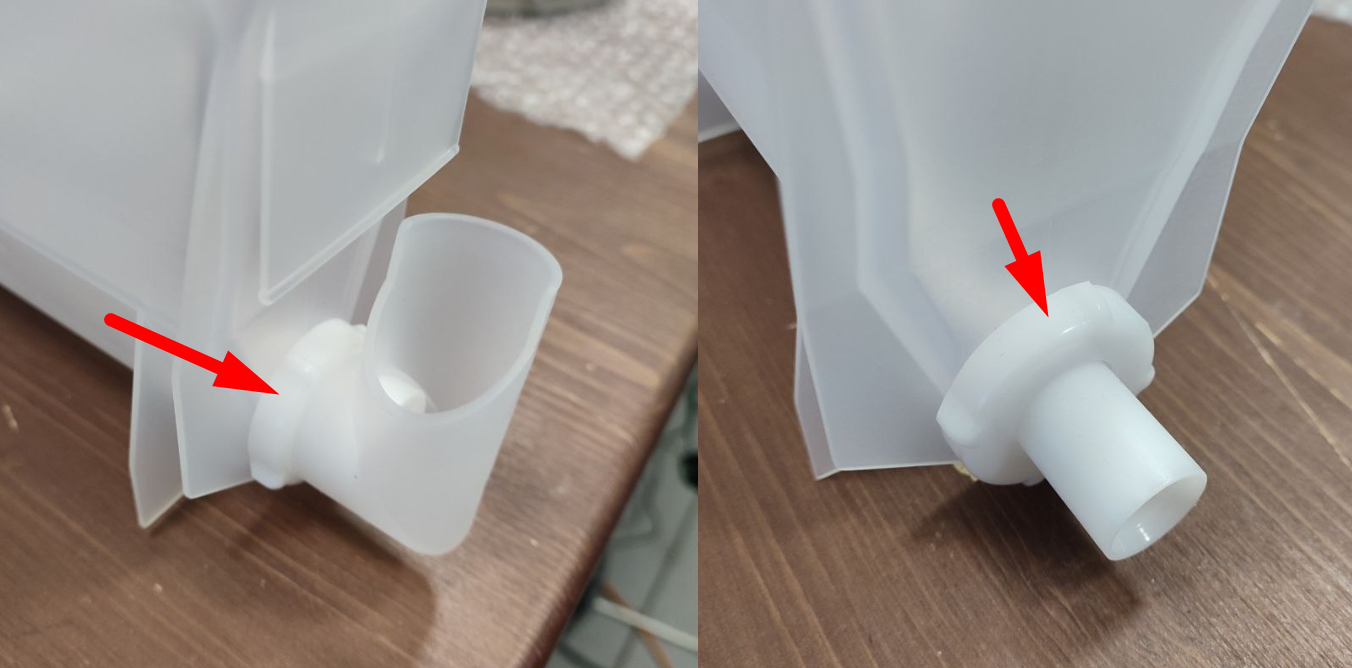
Question: Mixers often get clogged with powder. What causes this?
Answer: There may be several reasons:
- Incorrect assembly of mixer components - watch the video on mixer assembly/disassembly;
- Poor cleaning of mixers, filling hoses and fittings;
- Incorrectly selected dosage of the drink (too much powder and not enough water);
- Insufficient water pressure in the system (check the water level);
- Poor-quality detergent—loss of flowability (clumps form) and dampness due to improper storage. The presence of solid particles, crumbs, and dried fruit pieces in detergents can also lead to frequent clogging, even with regular maintenance.
Question: After turning on, the screen is black and the message “No signal” is displayed.
Answer: Press the ON/OFF.
Question: The machine resets immediately after starting cooking. What should I do?
Answer: Disassemble and clean the mixer components, check the correct assembly of the parts.