This article describes the Service Menu of the Milkshaker S model. With it you configure the drink assortment, prices, dosages, calibration, internet and telemetry connection, payment devices, and run maintenance routines such as mixer flush and concentrate priming. Sales are paused while the Service Menu is open.
To open the Service Menu, open the front door of the machine and press the SERVICE MODE button on the door panel. To close it, tap the × button in the top-right corner.
Quick navigation:
- Change drink assortment: SERVICE MODE → ⚙️ → Drinks → Filling.
- Change prices and dosages: SERVICE MODE → ⚙️ → Drinks → Trading Matrix.
- Calibrate drinks: SERVICE MODE → ⚙️ → Drinks → Calibration.
- Internet connection: SERVICE MODE → ⚙️ → Internet widget, or System Settings.
- Payment devices: SERVICE MODE → ⚙️ → Payment devices.
Service Menu
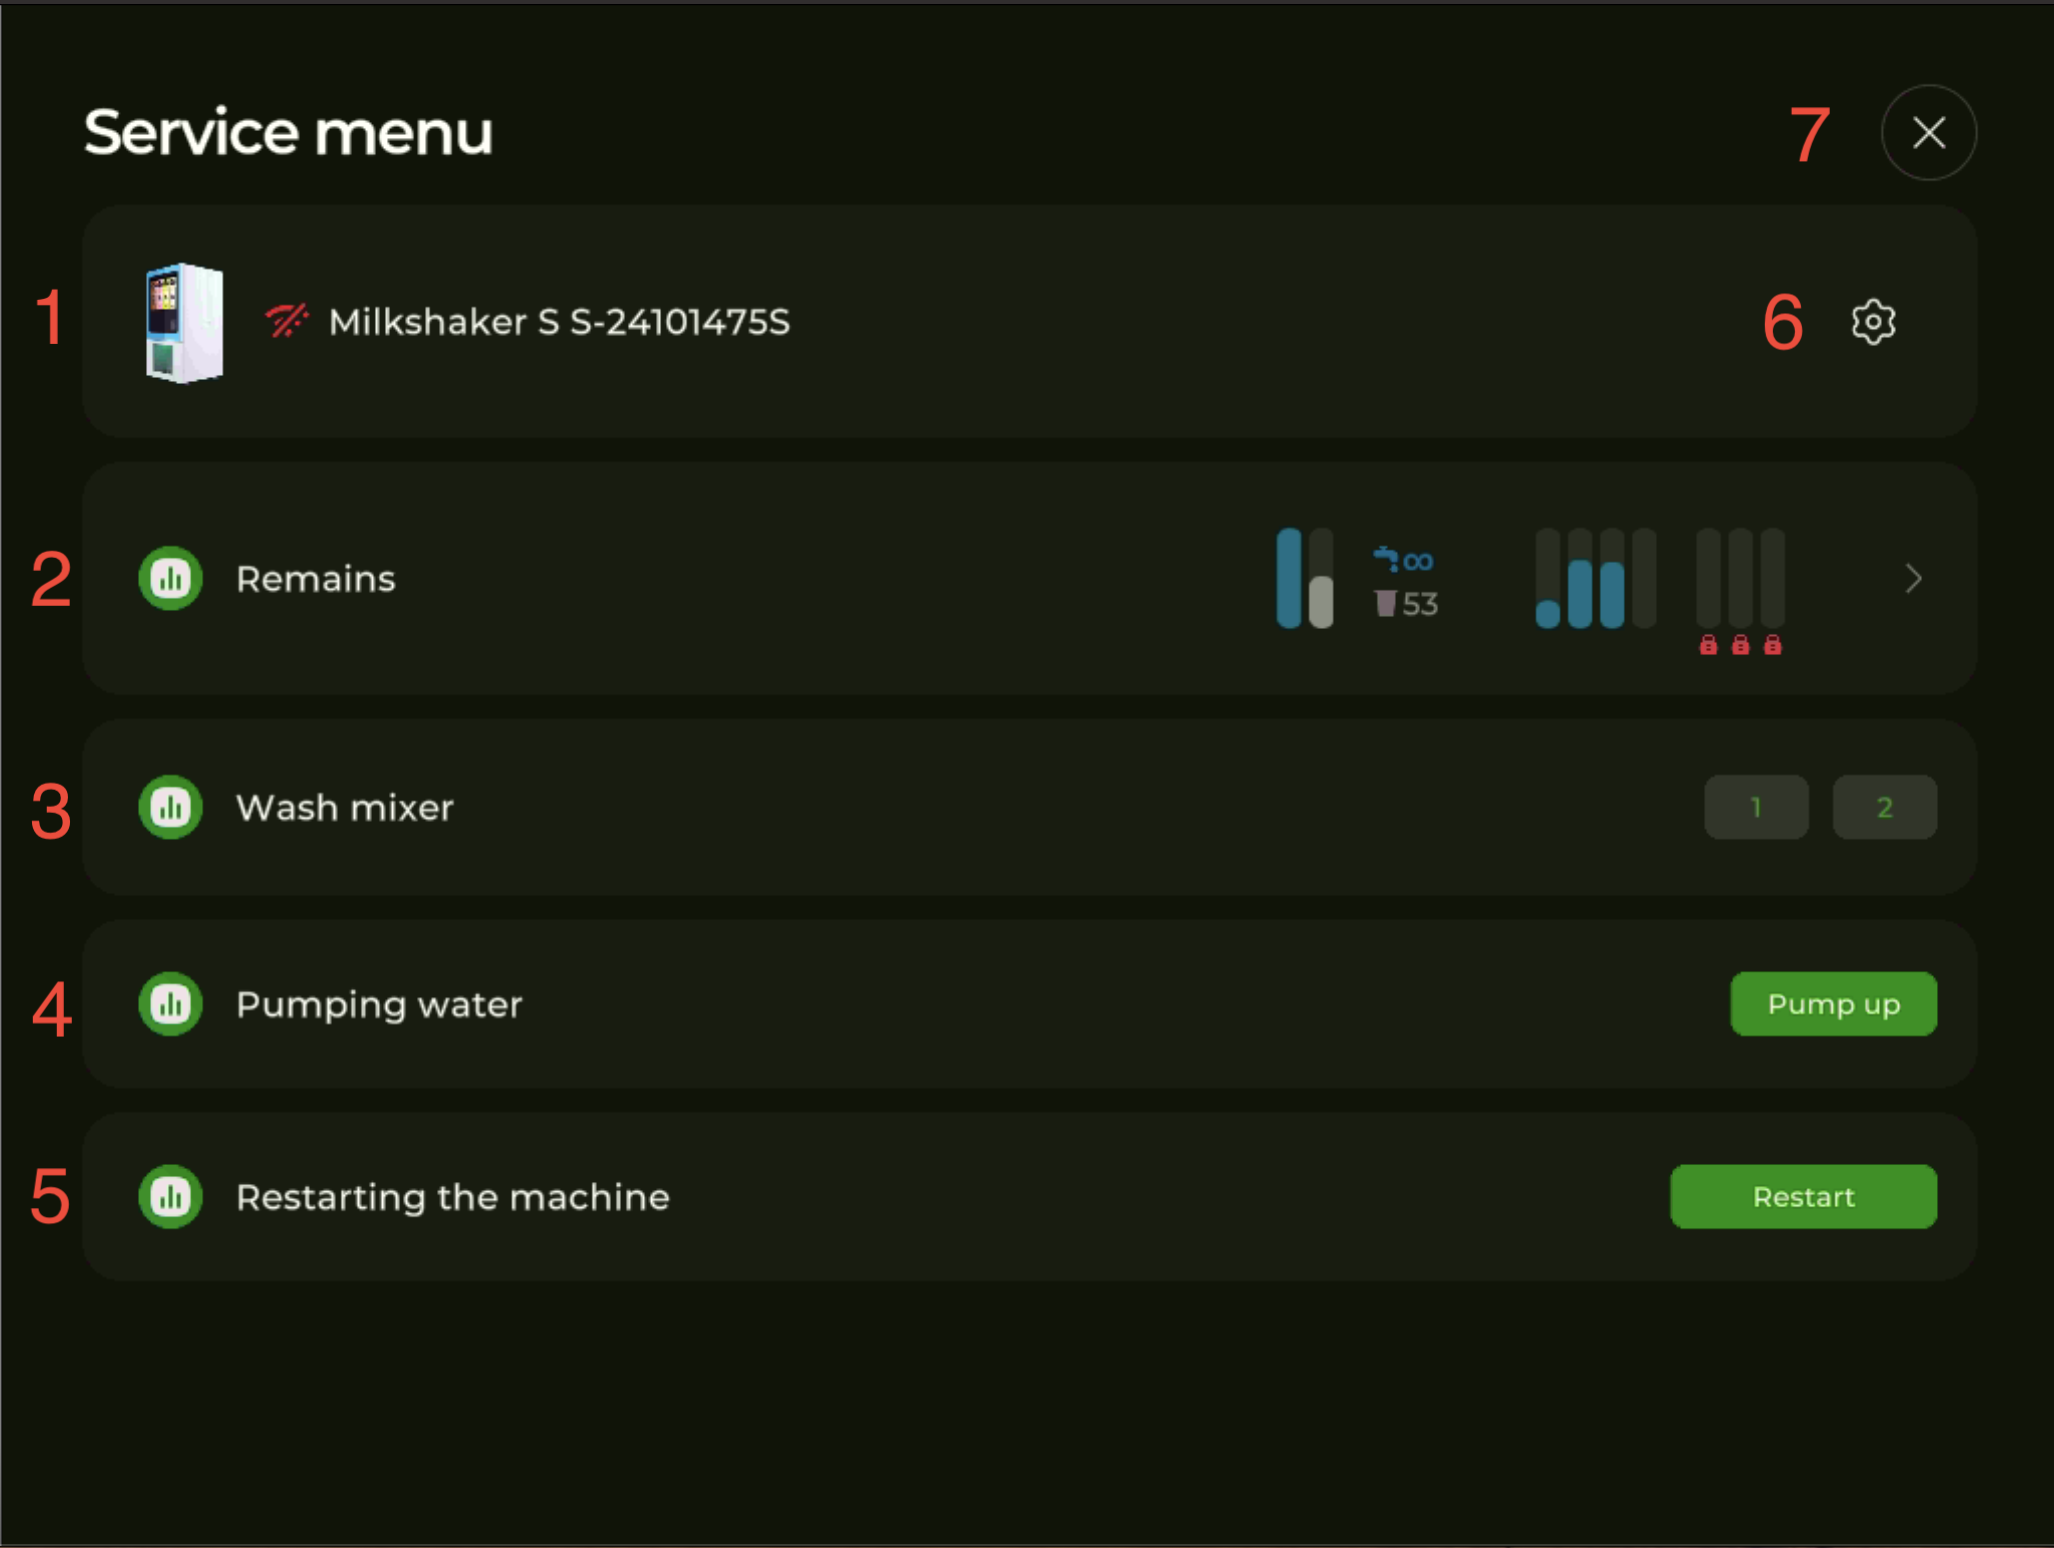
- Machine model name, serial number, and internet connection indicator (red — no connection or no network access; green — connection established).
- Remains — current stock of powders, syrups, water, and cups. Tap to open the Remains screen and adjust levels.
- Wash mixer — buttons to flush mixer 1 and mixer 2 manually.
- Pumping water — primes the hydraulic line; tap Pump up.
- Restarting the machine — restarts the on-screen application and the controller board (used to clear errors); tap Restart.
- ⚙️ Settings — opens the main settings menu (item in the machine card on the right).
- × — closes Service Menu.
Some installations also have a Cup test-dispense button on this screen — it appears only when the cup-dispensing module is enabled in Settings → Additional Modules. The example screenshot above is from a machine without that module.
Settings ⚙️
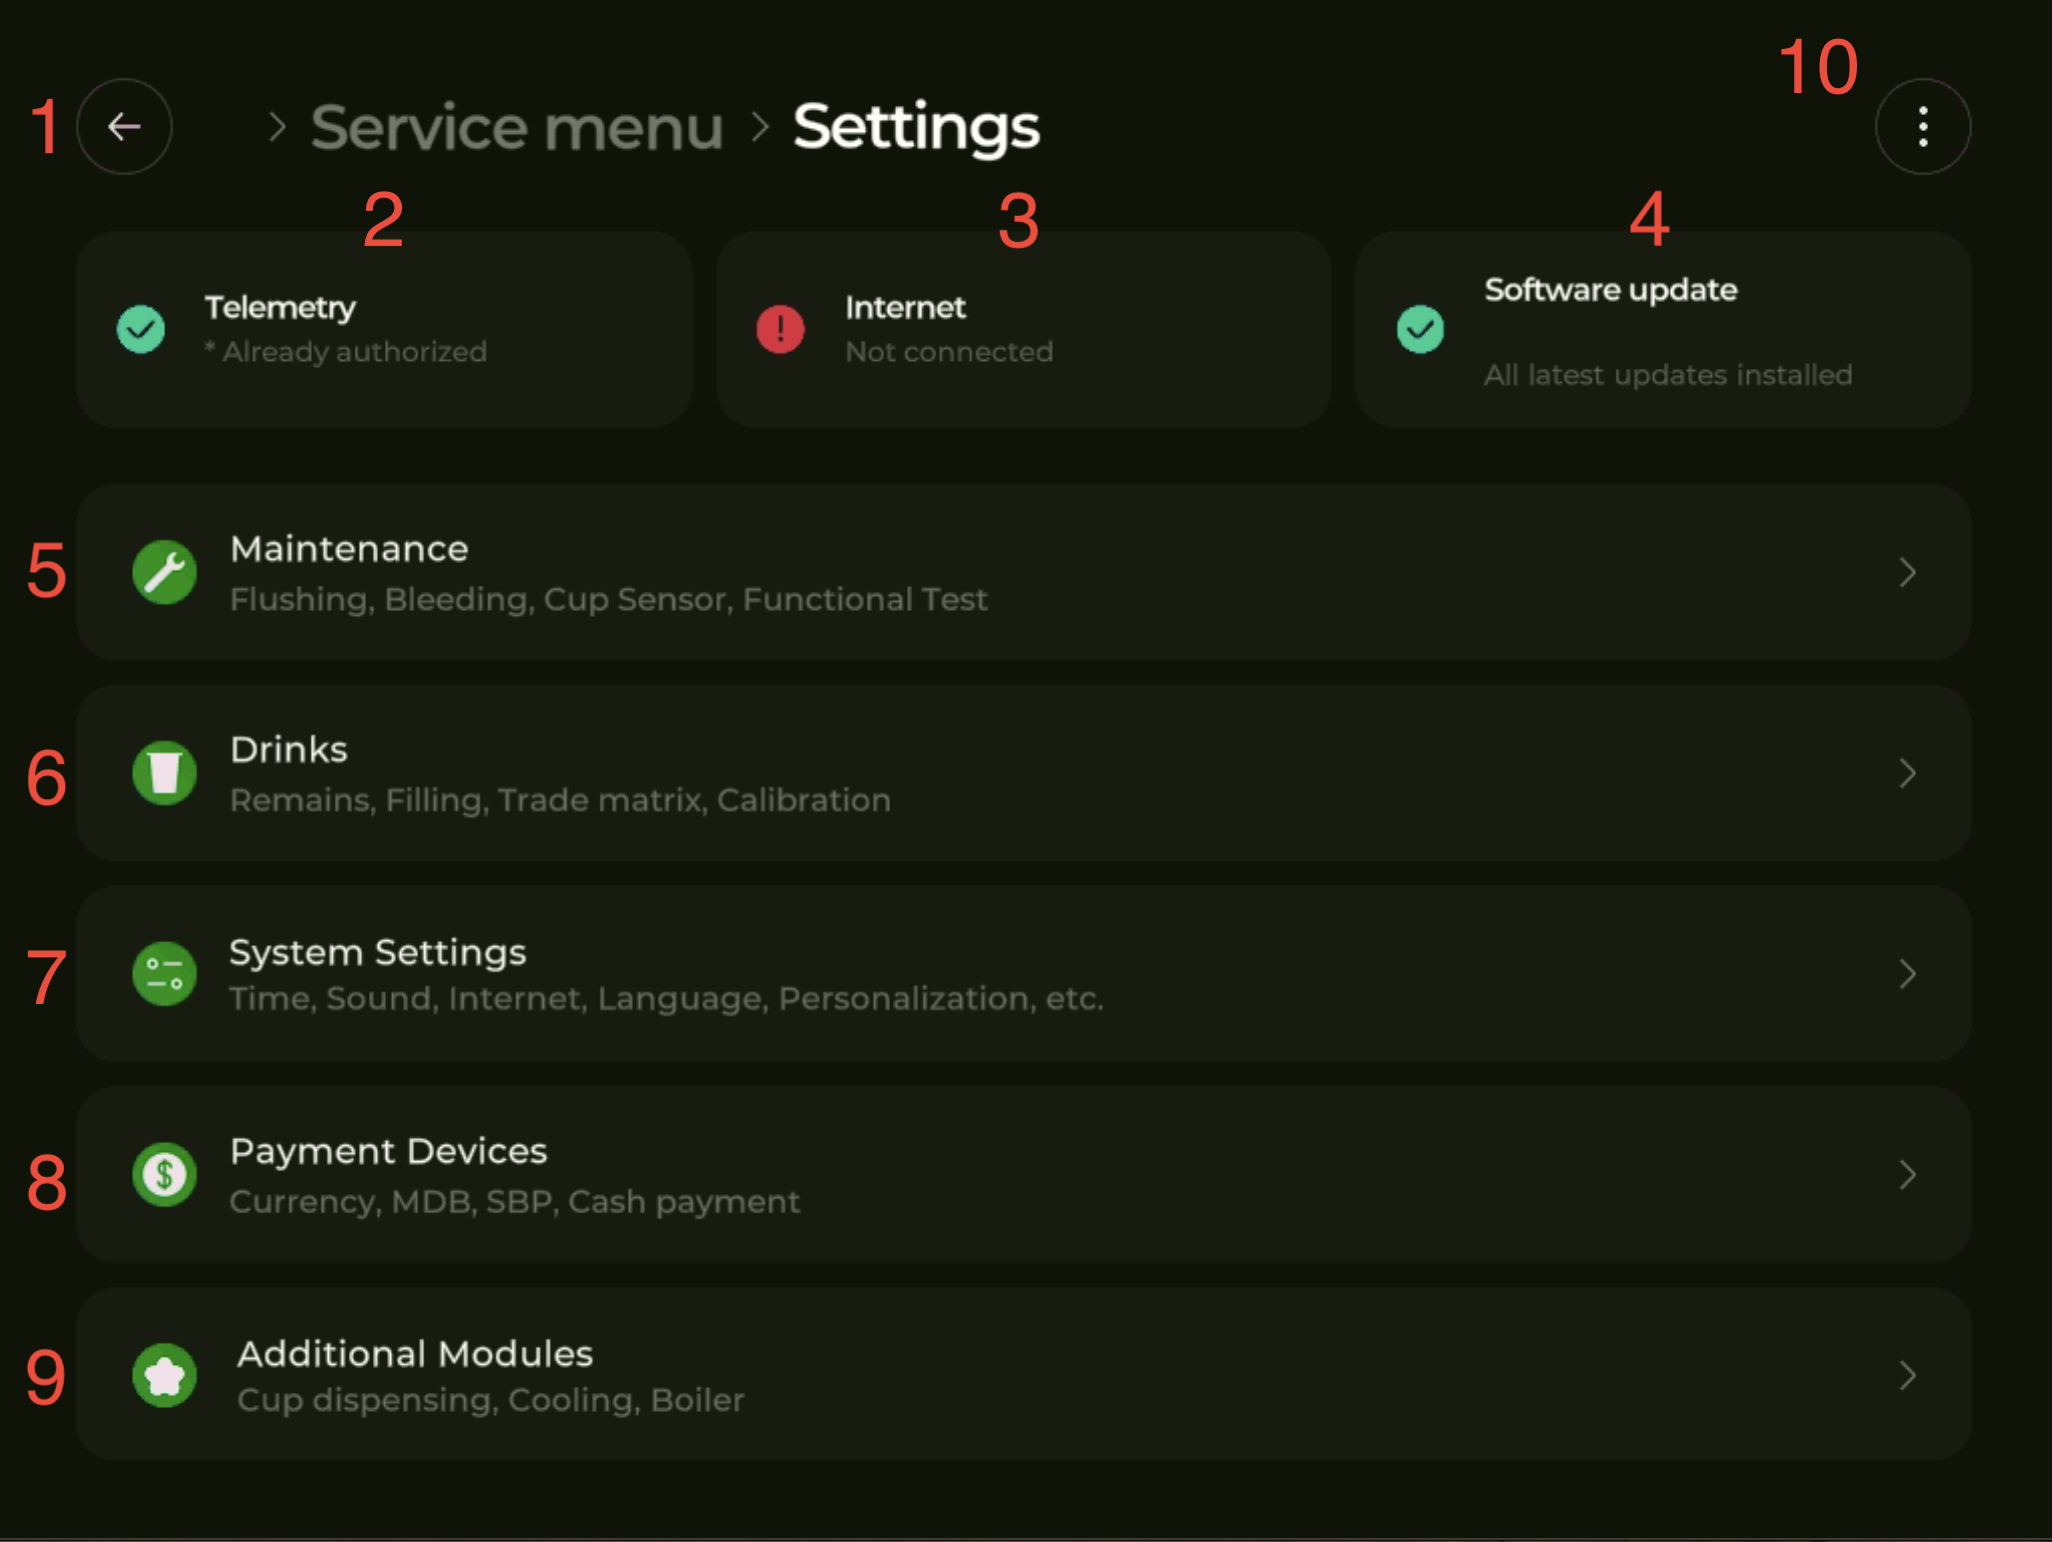
- Back arrow — returns to the previous screen.
- Telemetry — shows whether the machine is authorized in the iShaker telemetry account. Tap to open the registration-key entry. After authorization, a “Disconnect machine from telemetry” option appears here.
- Internet — current internet status (Connected / Not connected). Tap to switch the connection method or pick a Wi-Fi network.
- Software update — shows whether all latest updates are installed; tap to check and install.
- Maintenance — flushing, bleeding, cup sensor, functional test routines.
- Drinks — Remains, Filling, Trading Matrix, Calibration.
- System Settings — date and time, sound, internet method, language, personalization, machine restart and switch-off schedule.
- Payment Devices — currency, MDB, SBP, cash payment.
- Additional Modules — cup dispensing, cooling, boiler.
- ⋮ menu (top-right) — restart the on-screen application and controller board, or exit to the operating system.
Settings ⚙️ → Maintenance
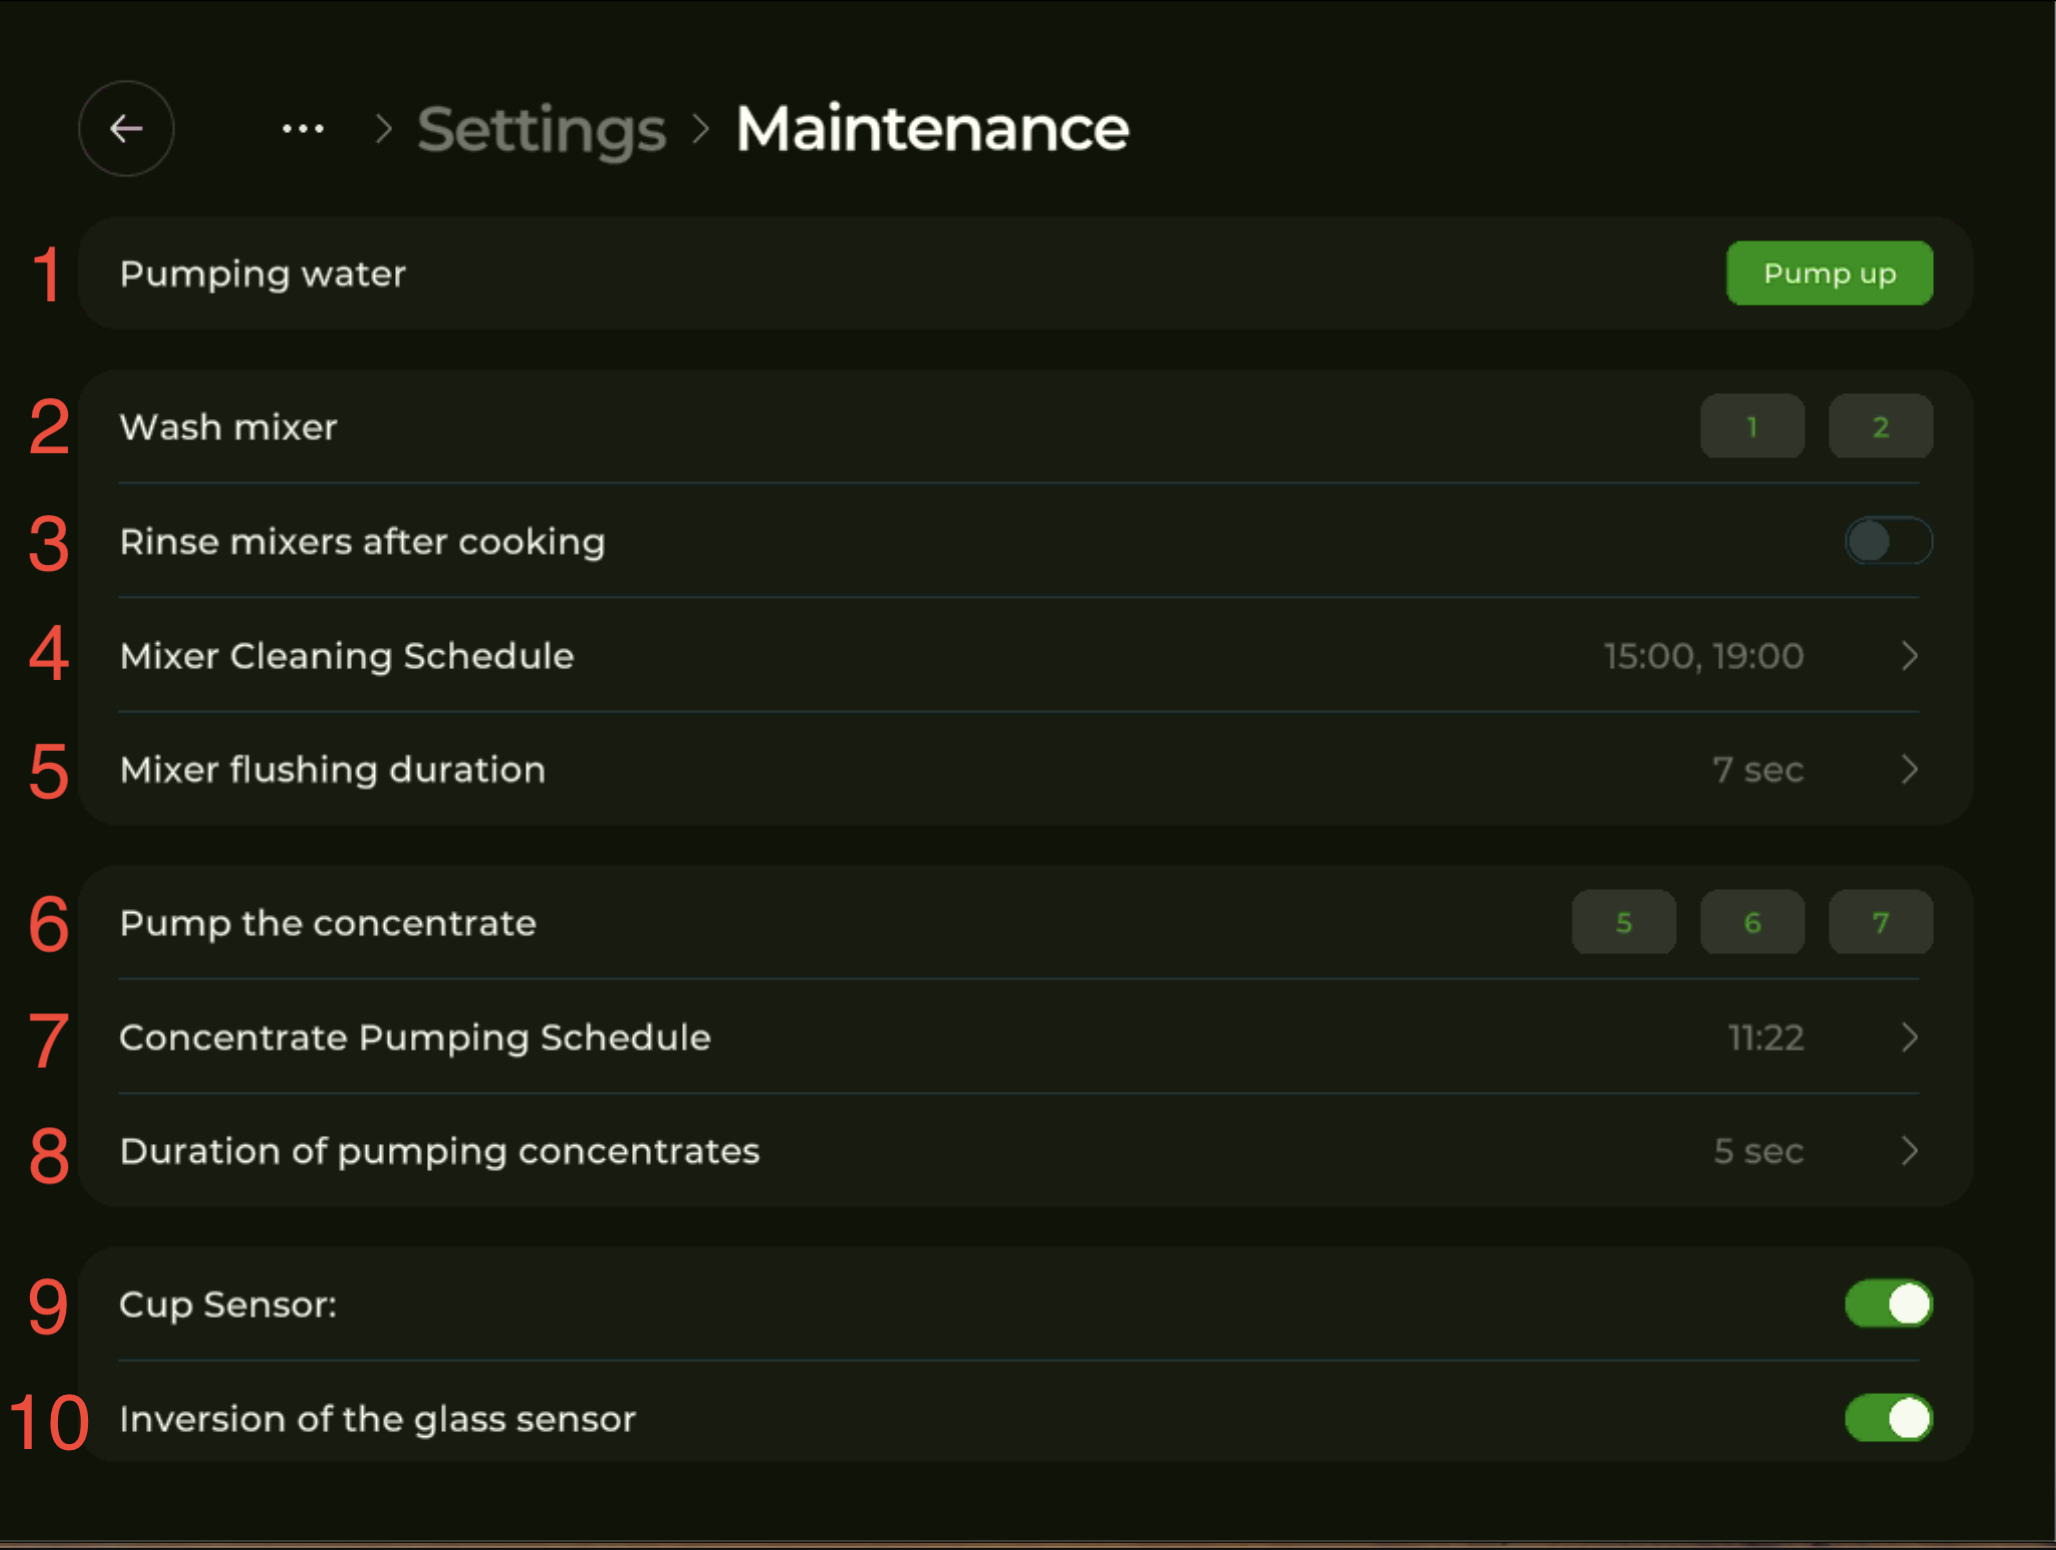
- Pumping water — primes the hydraulic water line; tap Pump up.
- Wash mixer — flushes mixer 1 or 2 manually.
- Rinse mixers after cooking — when enabled, the mixer used for the most recent drink is rinsed automatically right after dispensing.
- Mixer Cleaning Schedule — automatic mixer cleaning at the times shown (e.g. 15:00, 19:00). Tap to edit.
- Mixer flushing duration — how long each scheduled flush runs, in seconds.
- Pump the concentrate — buttons to fill the concentrate lines (slots 5, 6, 7) from the bottle to the mixing block.
- Concentrate Pumping Schedule — automatic priming once a day to compensate for overnight line drainage.
- Duration of pumping concentrates — pump runtime per slot, in seconds.
- Cup Sensor — toggle for cup-presence detection before and after dispensing. Keep this on for normal operation.
- Inversion of the glass sensor — flips the cup-sensor signal to support different sensor types. Do not change this without guidance from support@ishakerusa.com — an incorrect setting disables cup detection.
Settings ⚙️ → Drinks → Filling
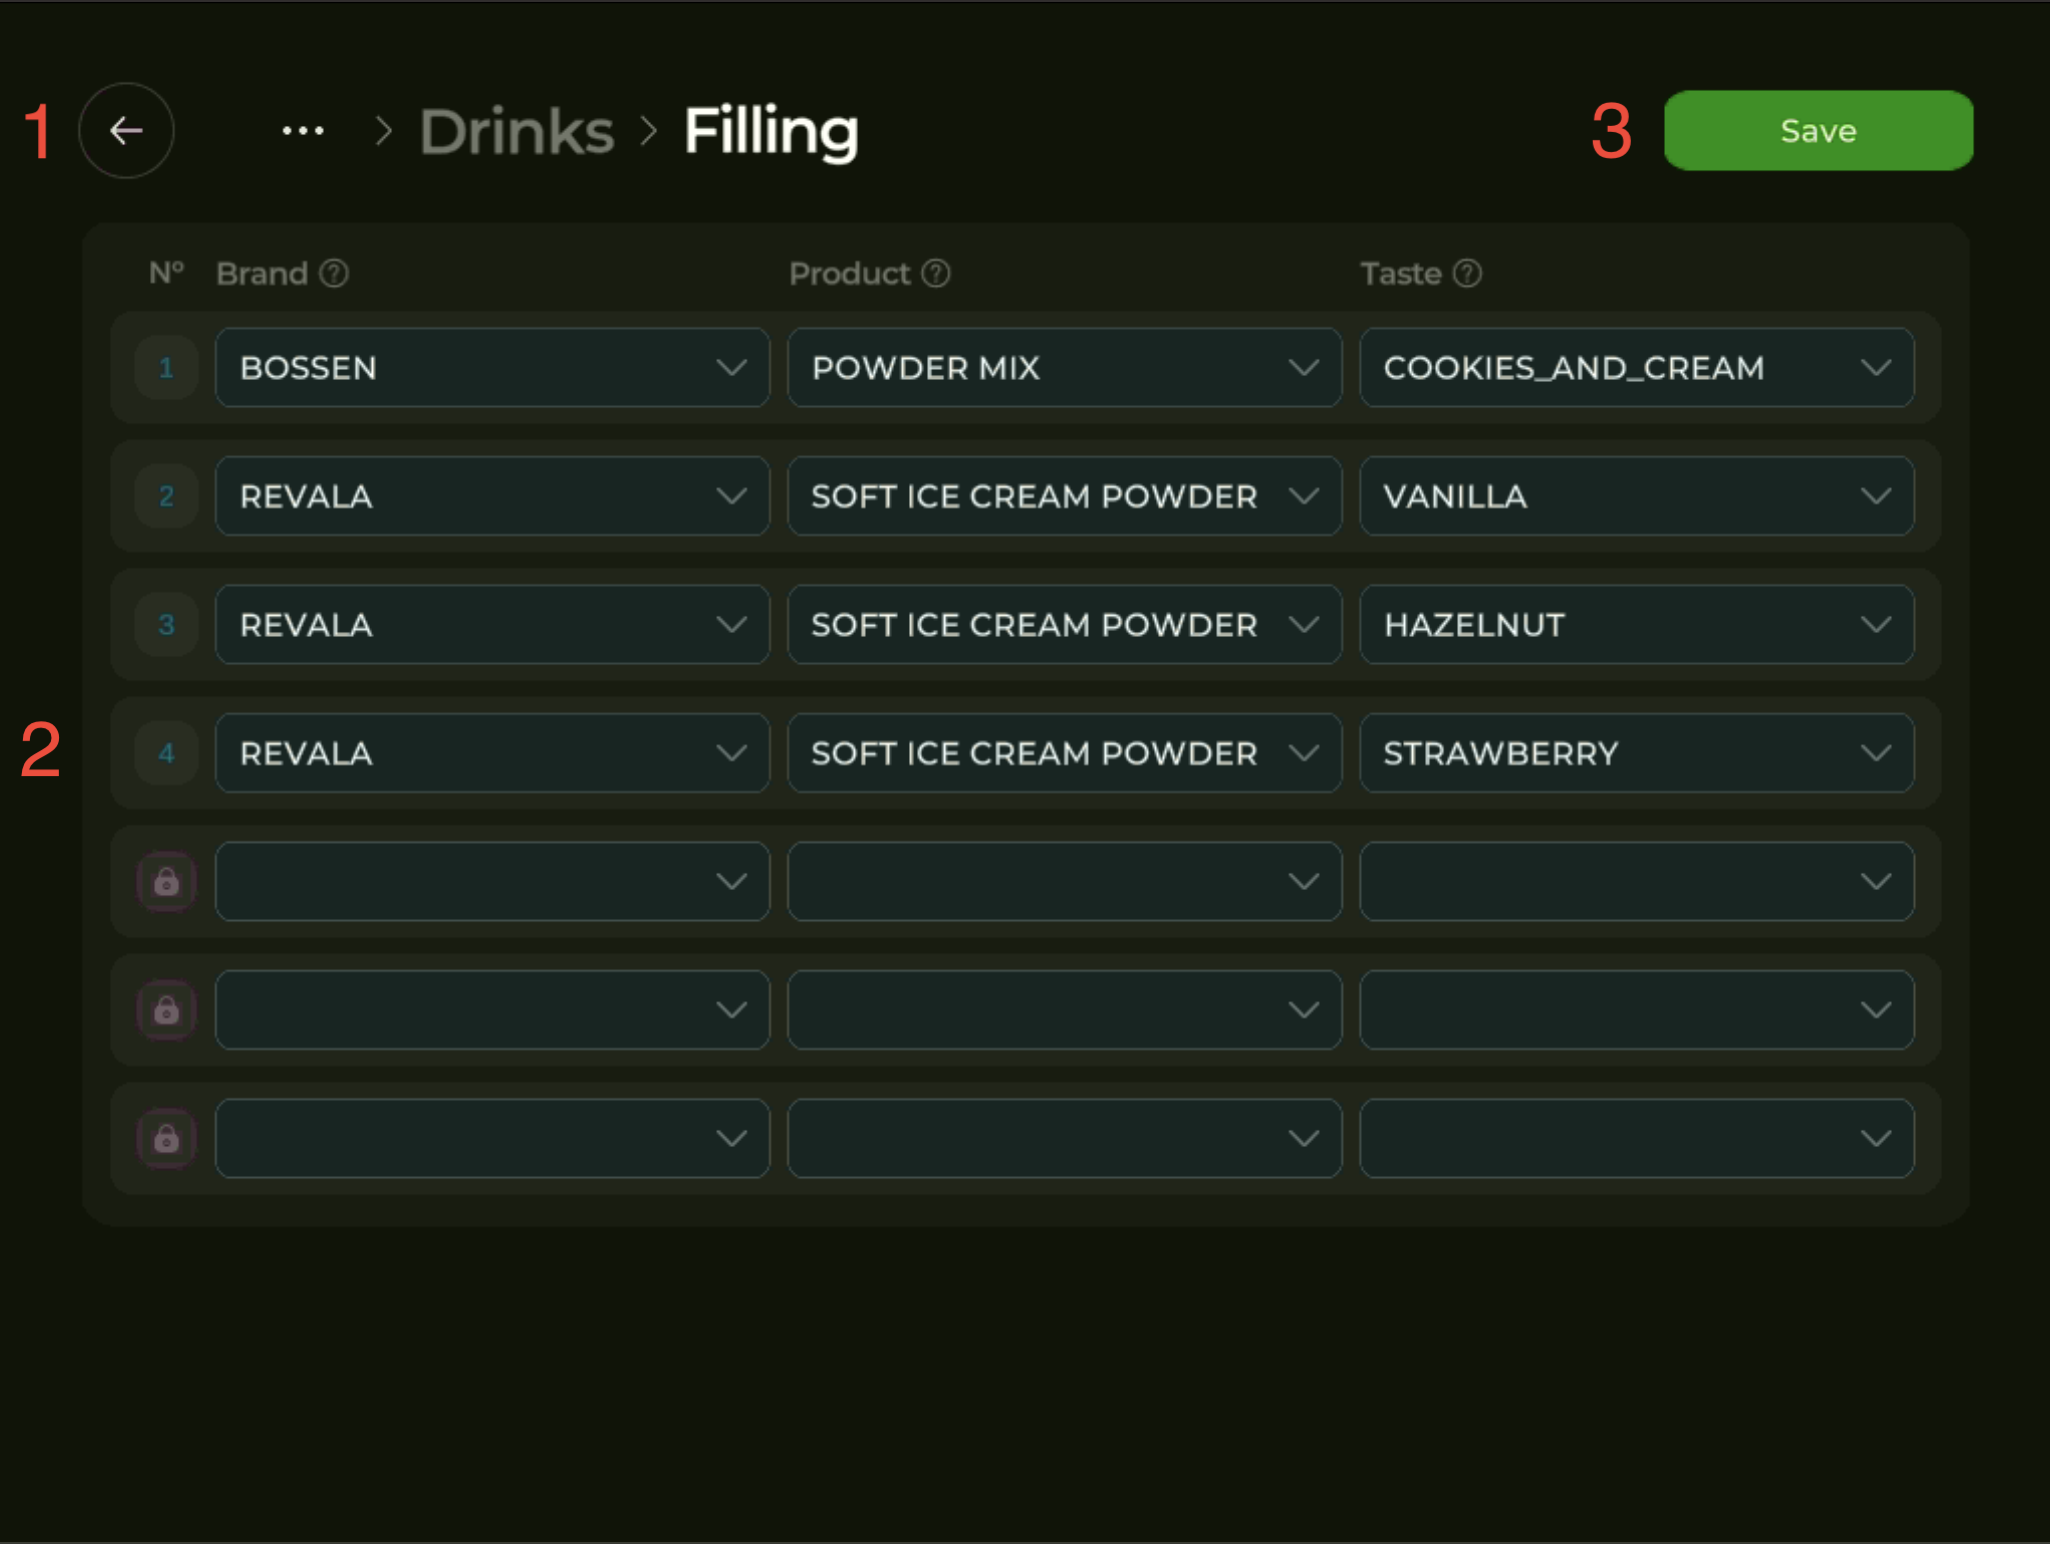
The Filling tab is where you set which drink each slot dispenses. Slots 1–4 are dry powders; slots 5–7 are syrups (concentrates).
- Back arrow — returns to the previous screen.
- Slot list with three columns: Brand, Product, Taste. For the slot you want to fill, tap each column and pick a value. You cannot assign a syrup to a powder slot or a powder to a syrup slot. Empty syrup slots are shown with a lock icon — they are blocked from sale until configured.
- Save — saves the changes (top-right green button).
Brand, product, or taste not on the list? Email support@ishakerusa.com with a link to the product. The catalog updates automatically when the machine is online and registered in the iShaker telemetry account.
Settings ⚙️ → Drinks → Remains
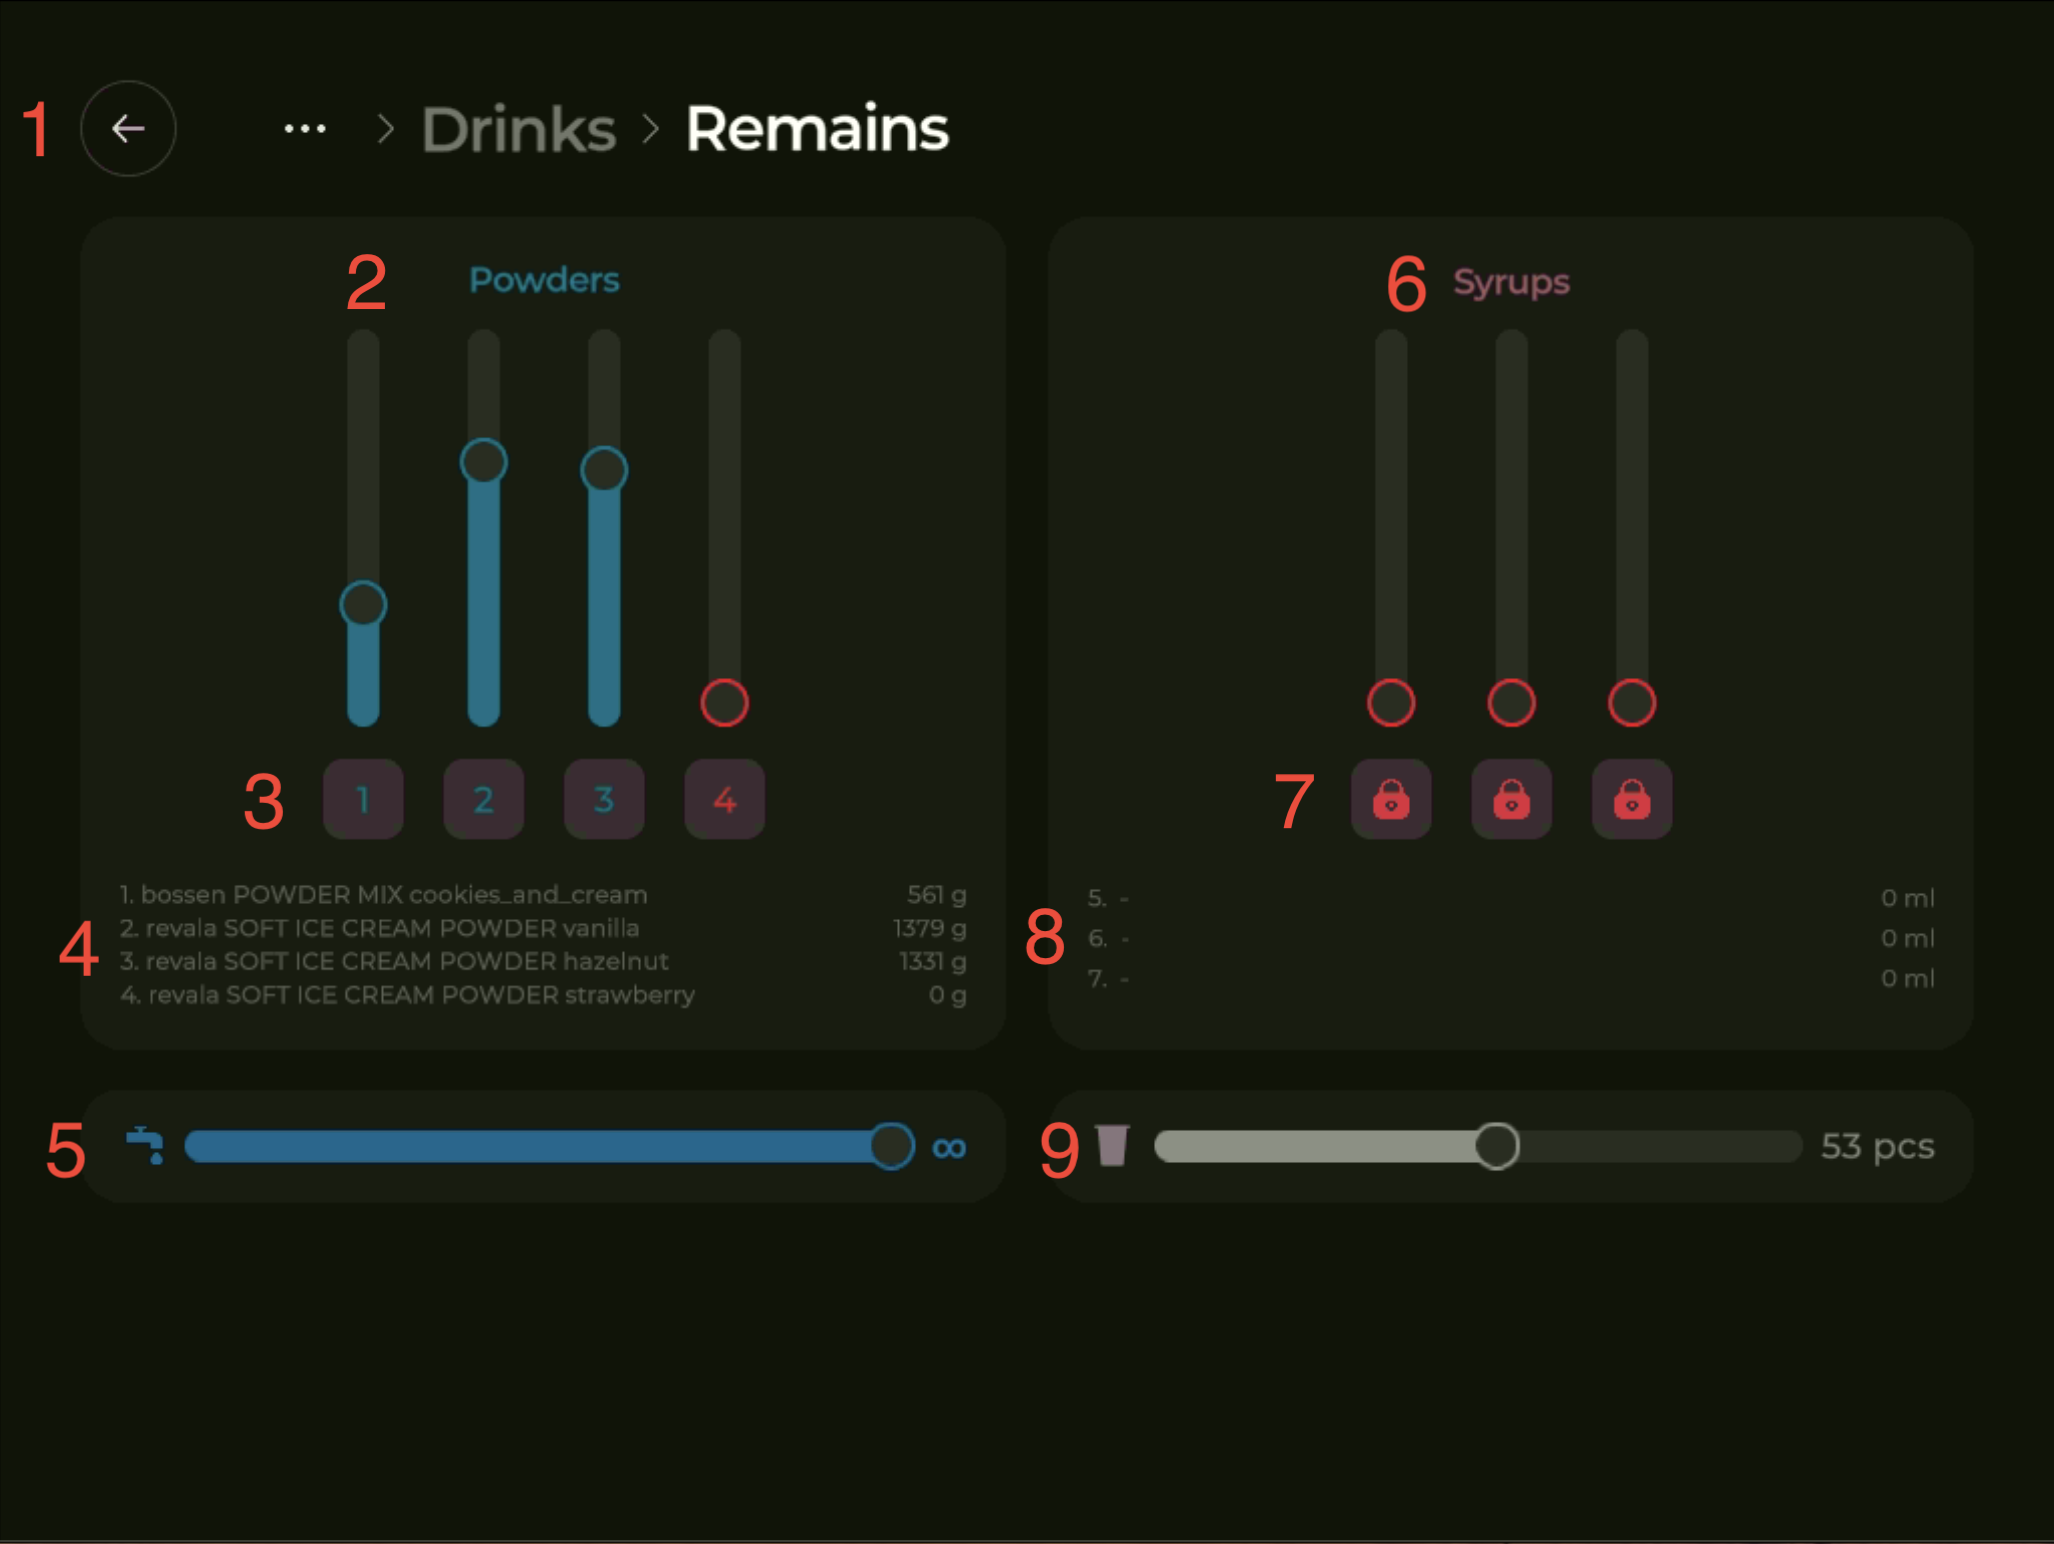
- Back arrow — returns to the previous screen.
- Powders — sliders for the current quantity in each powder slot (1–4).
- Lock-out switches that take powder slots 1–4 out of sale. Locked slots show a red icon.
- Names and gram amounts of powders currently assigned to slots 1–4.
- Water level — full bar when bottle water is selected in telemetry.
- Syrups — sliders for the current quantity in each syrup slot (5–7).
- Lock-out switches for syrup slots 5–7. (In the example screenshot above all syrup slots are locked because no products are assigned to them yet.)
- Names and millilitre amounts of syrups assigned to slots 5–7.
- Current cup count.
Remains must be updated manually after every refill or container replacement. The machine subtracts what it dispenses but cannot detect refills.
Settings ⚙️ → Drinks → Trading Matrix
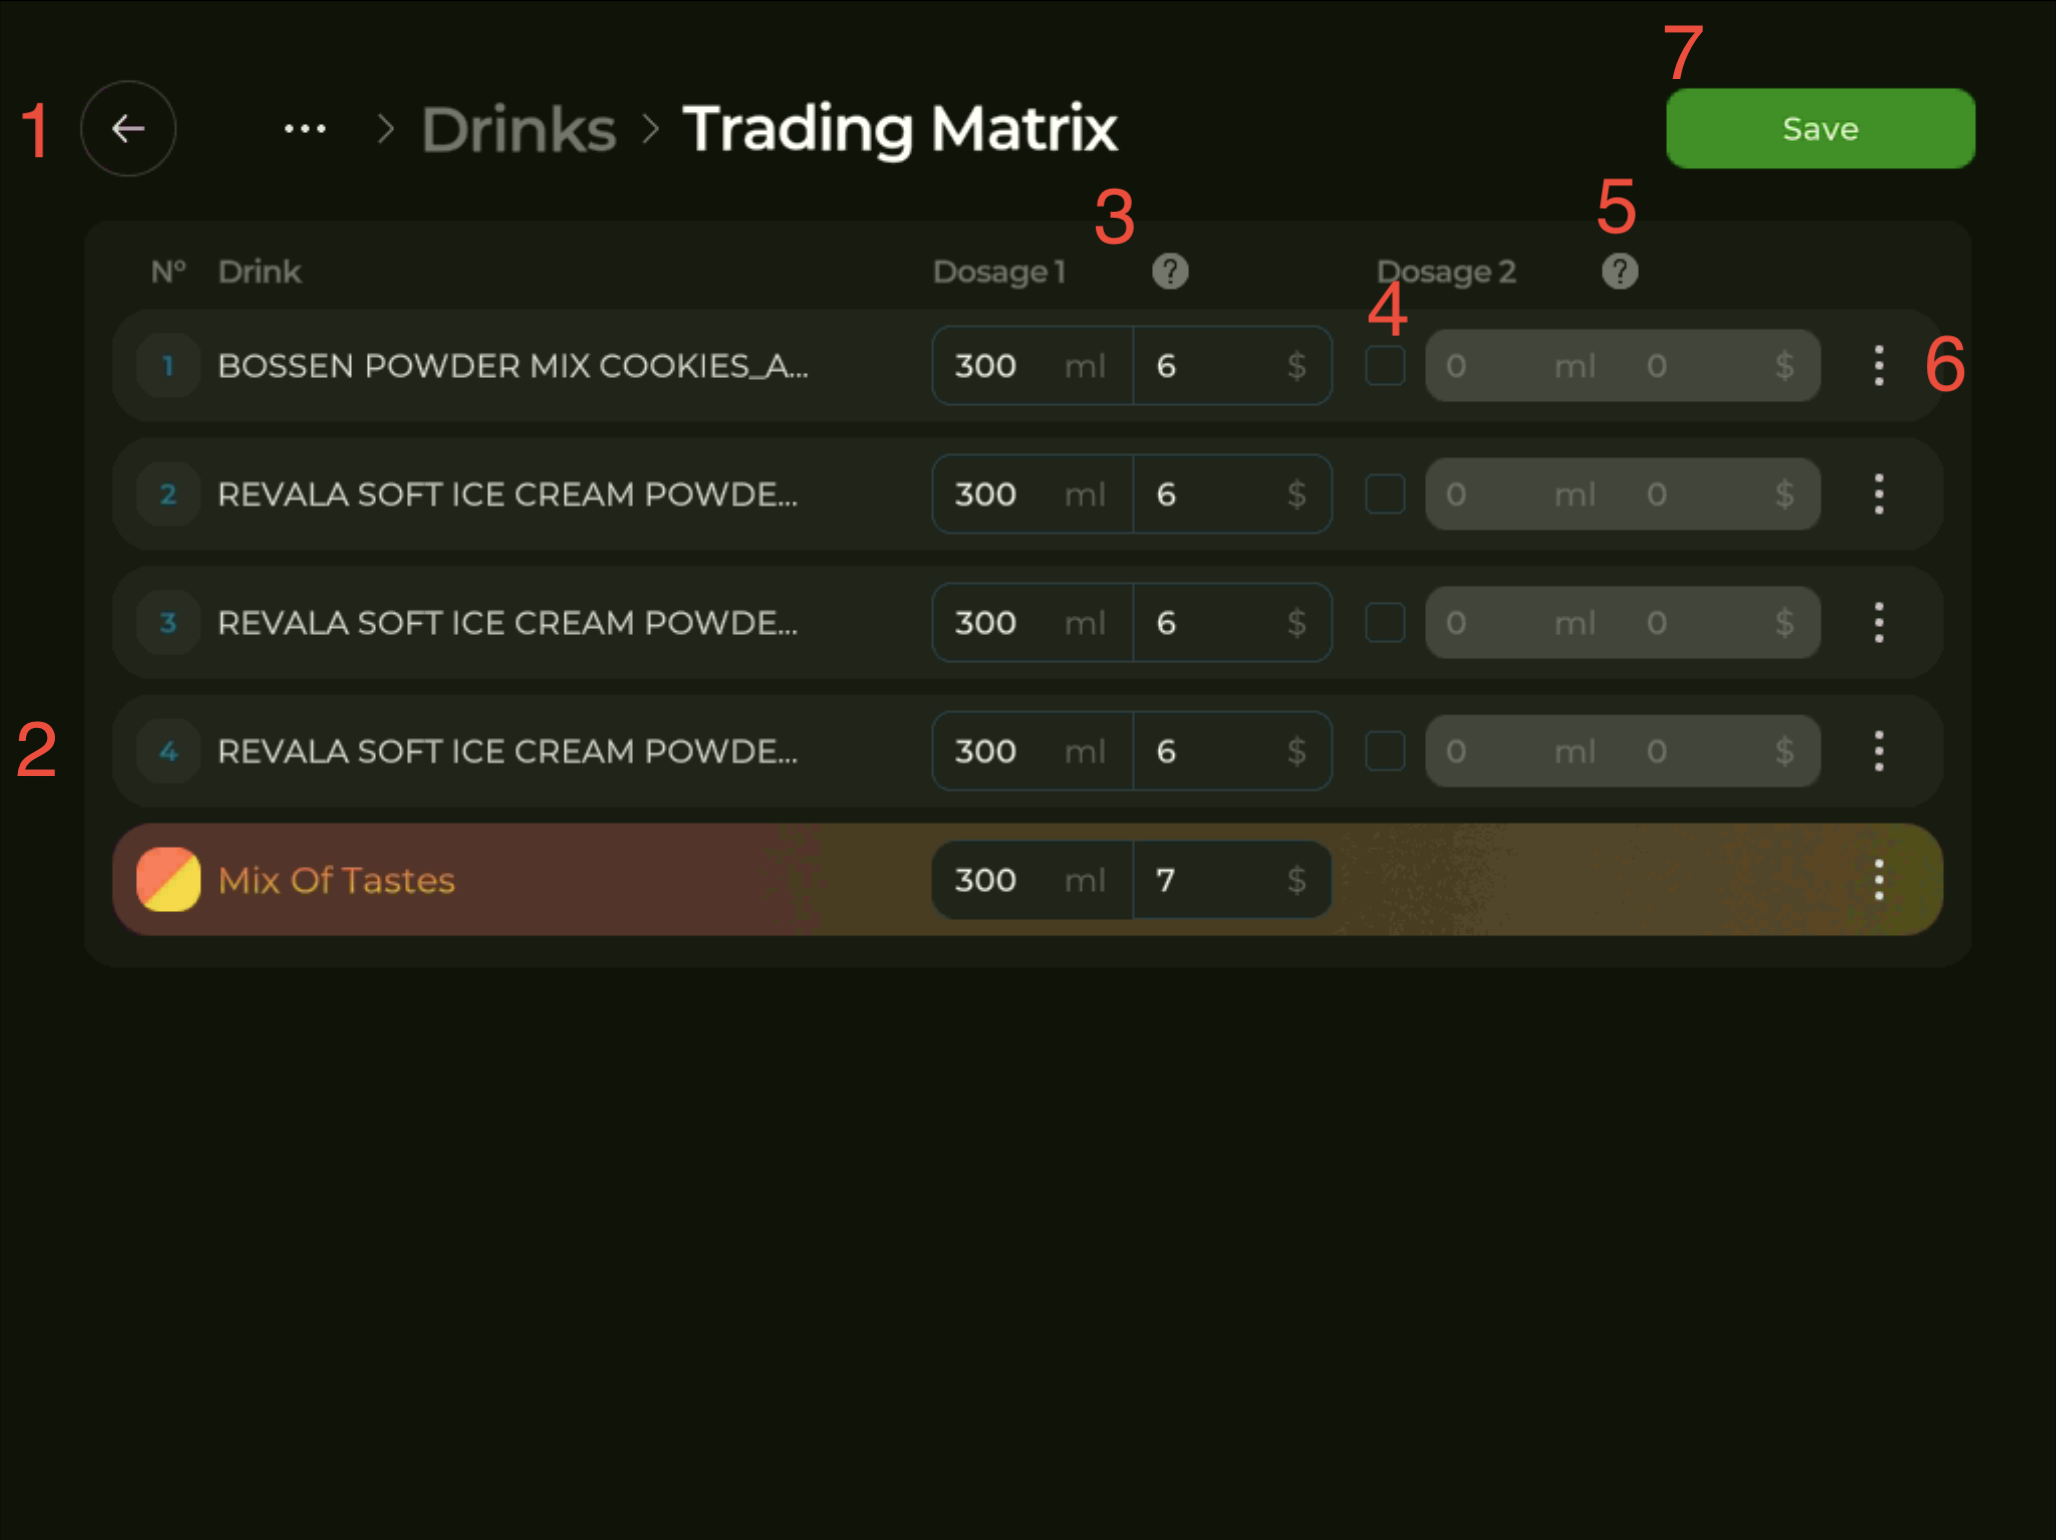
- Back arrow — returns to the previous screen.
- List of drinks available for configuration. The last row, Mix Of Tastes, is a special multi-flavor combo position; its volume and price are set the same way as for any other drink.
- Dosage 1 — volume (in ml) and price (in your machine’s currency) of the primary cup.
- Toggle for Dosage 2. Off = secondary dosage is not for sale. (In the example screenshot above Dosage 2 is OFF for every drink.)
- Dosage 2 — volume and price of the secondary cup (typically a smaller portion). Editable only when the toggle in column 4 is on.
- ⋮ per-drink menu — opens four actions per drink: Block from sale, Container settings, Drink settings, and Calibration. The Container and Drink screens are described below.
- Save — applies all changes (top-right green button).
⋮ Container settings
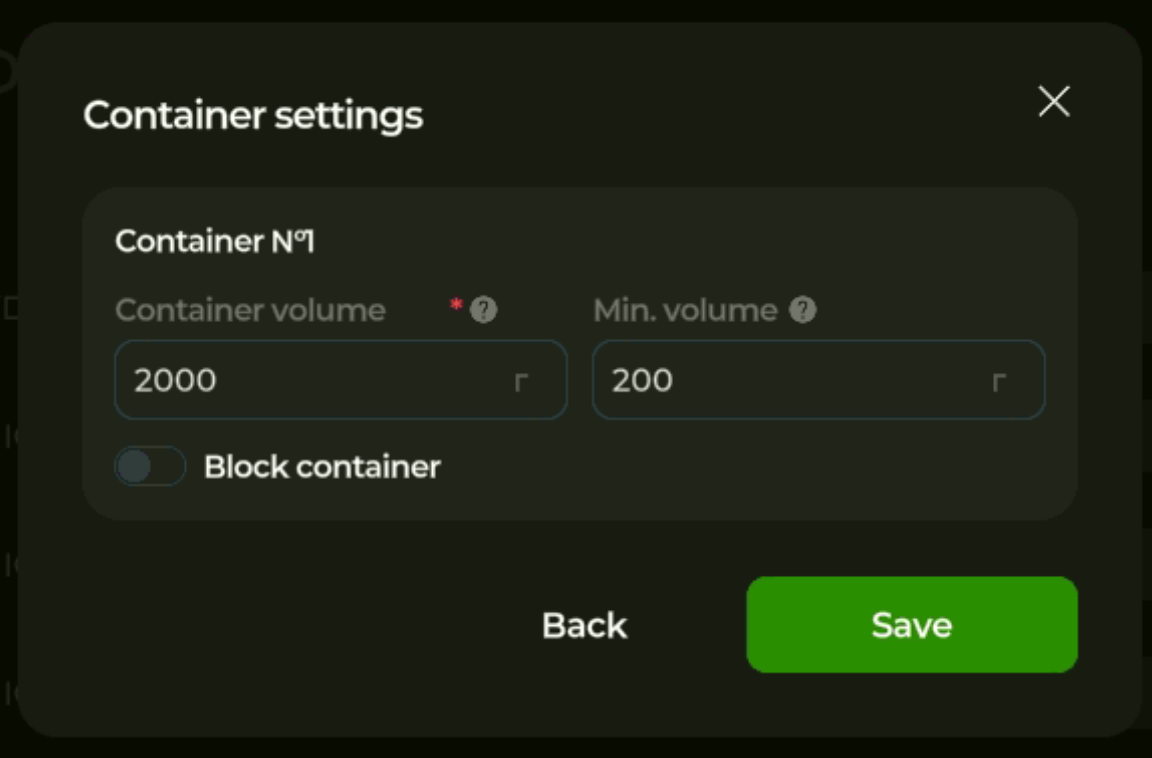
- Container N° — the slot number this dialog applies to.
- Container volume — total amount of product loaded in the container (required field, marked with the red asterisk).
- Min. volume — when the remaining quantity drops below this threshold, the drink is automatically blocked from sale.
- Block container — manually take this slot out of sale.
- Back / Save — close without saving / save and close.
⋮ Drink settings
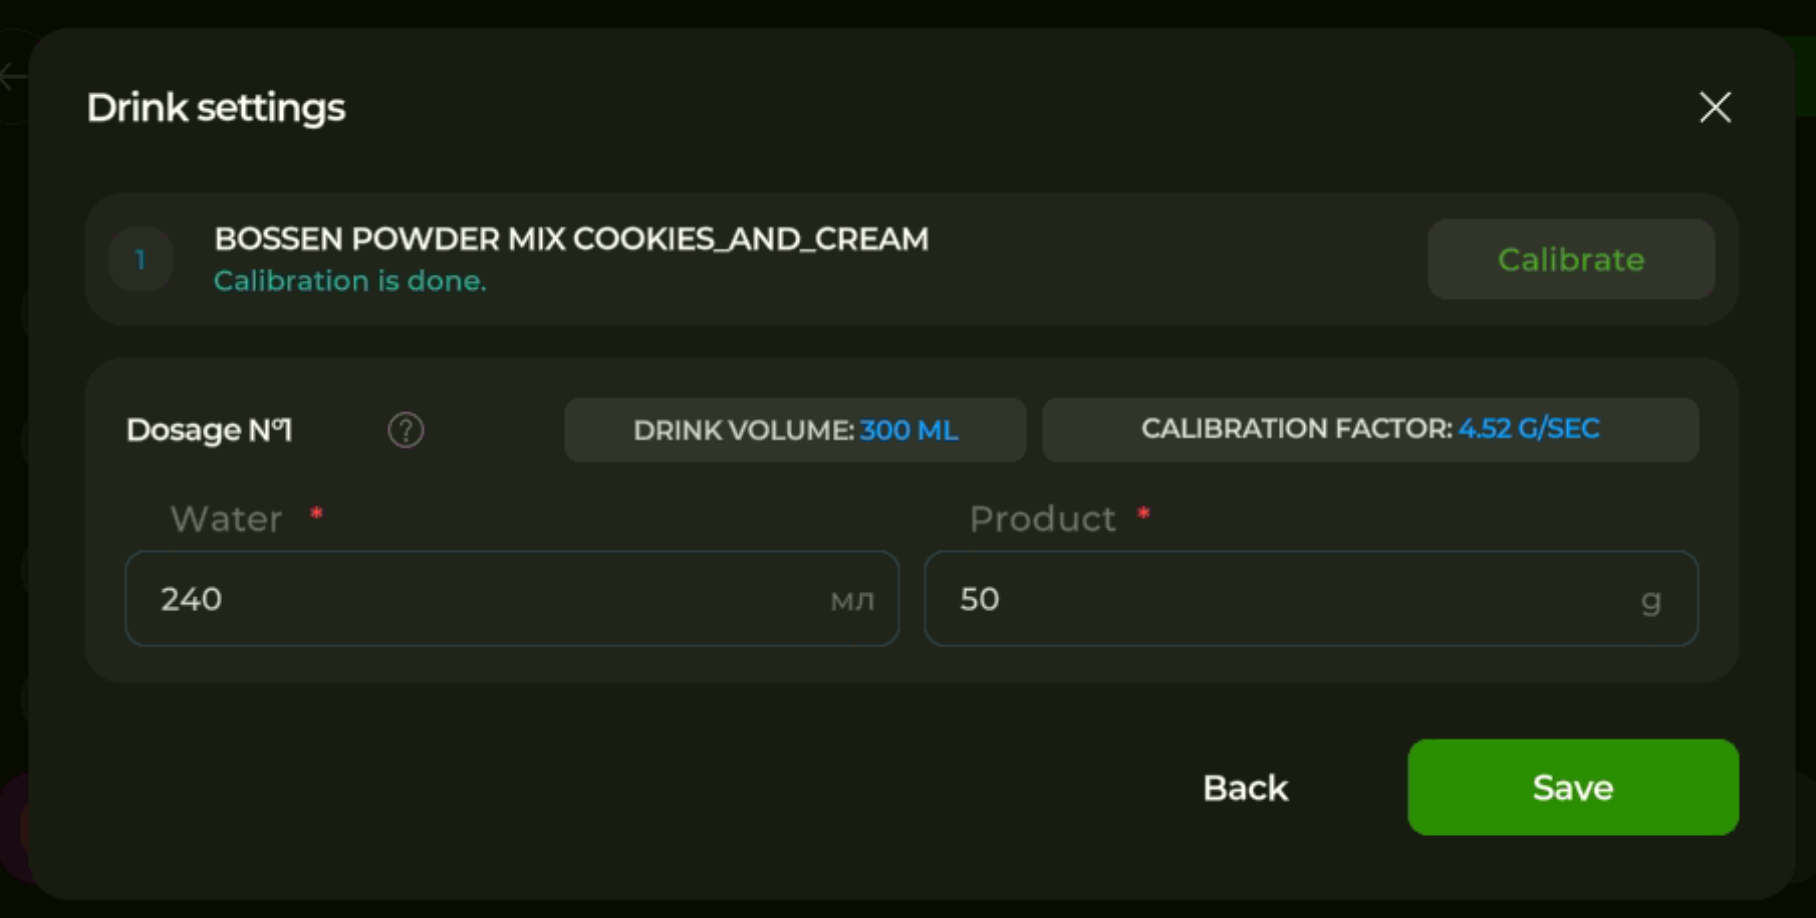
- Drink identification line — slot number, brand–product–taste, calibration status. “Calibration is done.” means the drink is within tolerance.
- Calibrate button (top-right) — starts the calibration routine for this drink.
- Drink volume — current target ready-cup volume for this dosage.
- Calibration factor — the dispense rate (g/sec) found during the last calibration. This number drives all future dispenses for this drink.
- Water — water dose per cup, in ml.
- Product — powder dose per cup, in grams.
For a hands-on calibration walkthrough, see Adjusting the amount of water and powder.
Settings ⚙️ → Drinks → Calibration
Calibration has three tabs: water, powders, syrups. Pick the tab and read the on-screen instructions before you start. You will need a kitchen scale and a measuring cup (up to 500 ml for water, up to 50 ml for syrups).
The procedure is the same on every tab: dispense, weigh or measure the actual amount, enter it on the screen, repeat until the result is within tolerance:
- Powders: actual within ±1.5 g of the target.
- Water: actual within ±10 ml of the target.
- Syrups: actual within ±1 ml of the target.
A drink that needs calibration is marked with a red icon; the icon turns green after a successful calibration.
Settings ⚙️ → System Settings
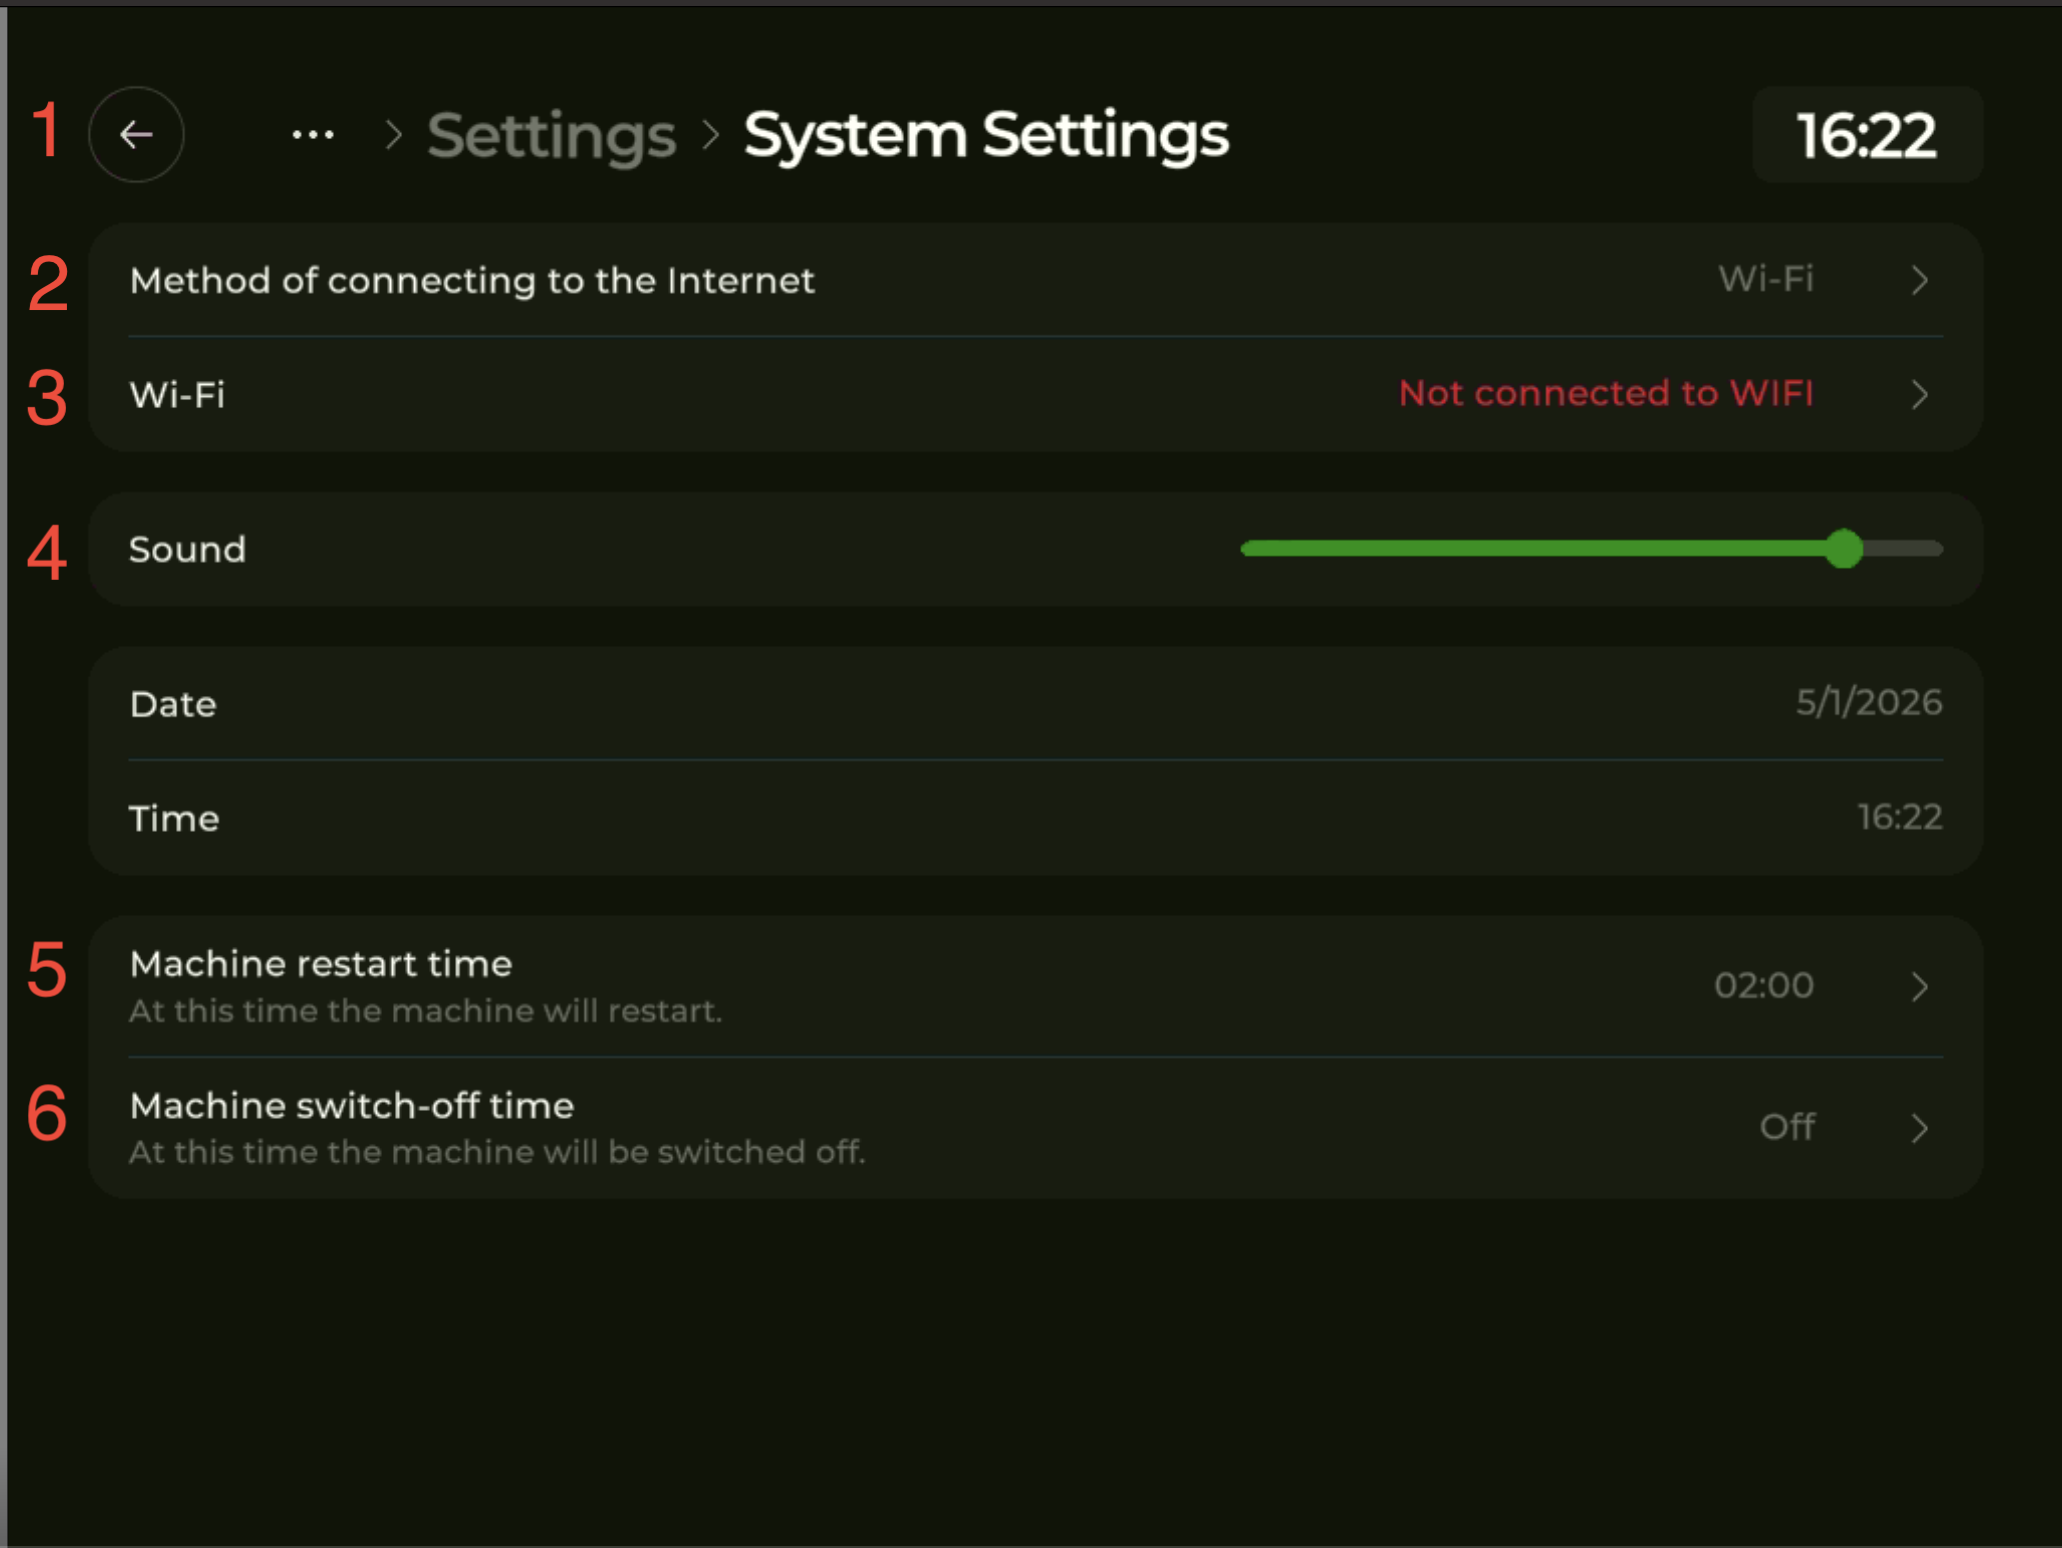
- Back arrow — returns to the previous screen.
- Method of connecting to the Internet — Wi-Fi or LAN.
- Wi-Fi — current network. If the machine is not connected, the line shows “Not connected to WIFI” in red. Tap to open the network picker and join a Wi-Fi.
- Sound — volume slider for voice prompts.
- Machine restart time — time of day when the on-screen application and controller restart automatically. Recommended to keep the machine responsive long-term.
- Machine switch-off time — time of day when the machine powers off the screen and goes idle. Set to Off to keep the machine running 24/7.
The block between Sound and the schedule fields shows the current Date and Time. Tap it to correct them — both are used by the restart and switch-off schedules and by the sales reports.
Settings ⚙️ → Payment devices
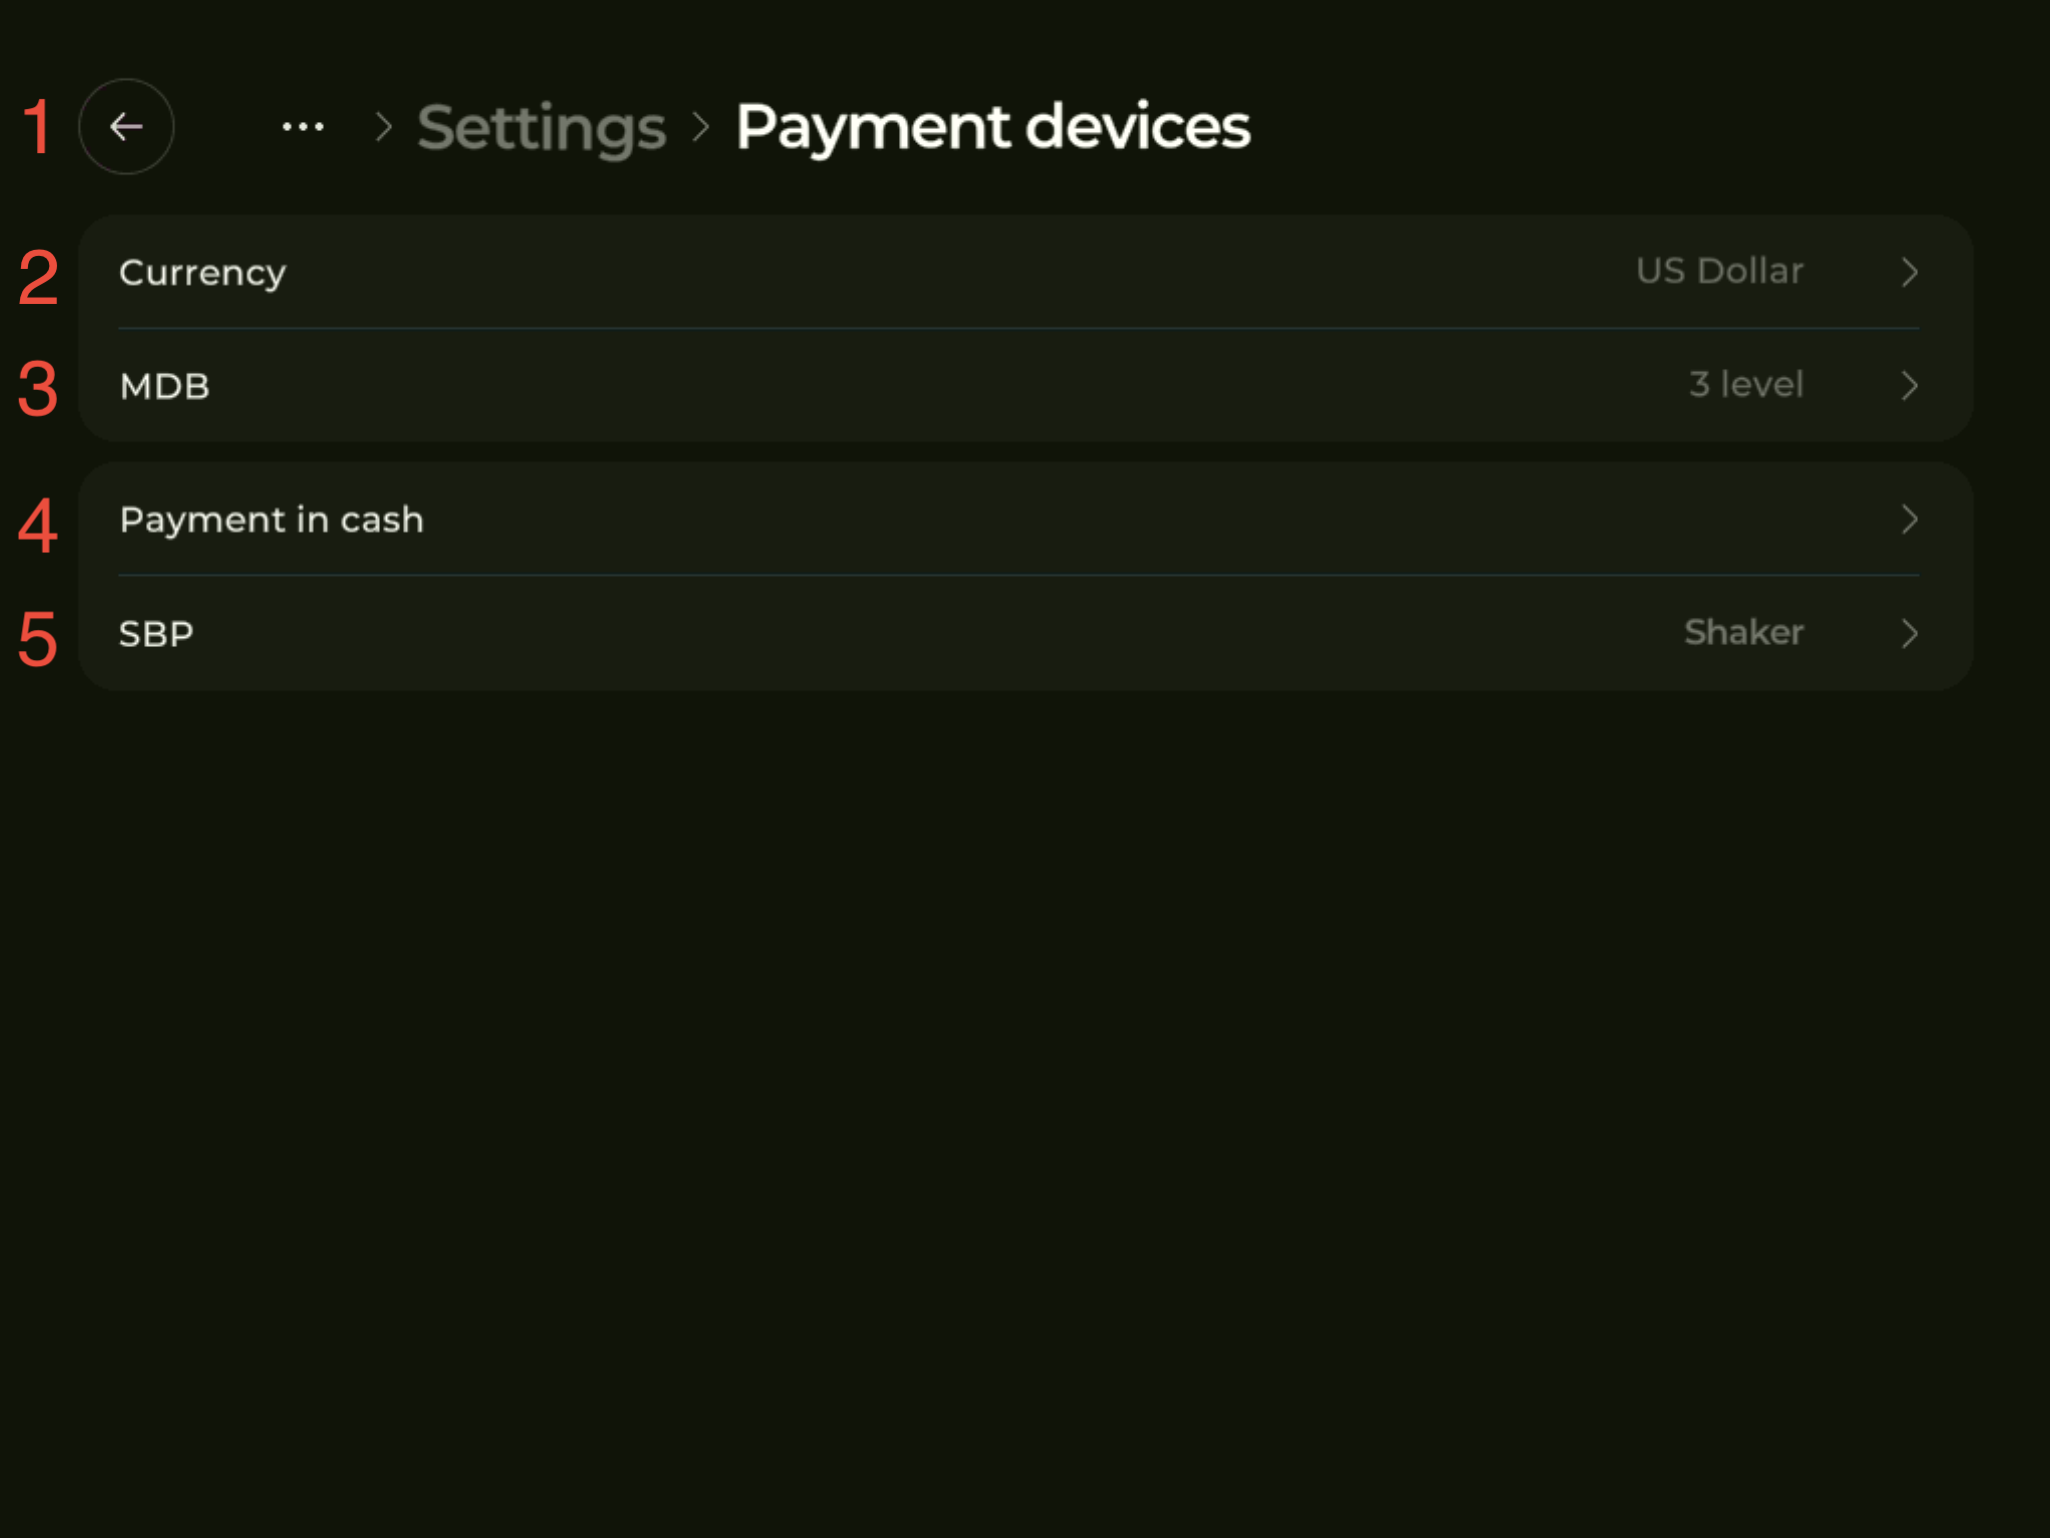
- Back arrow — returns to the previous screen.
- Currency — the currency the machine charges in (e.g. US Dollar). Tap to change.
- MDB — MDB protocol level (default: 3). Used for cashless payment terminals connected over MDB.
- Payment in cash — opens device-type selection (coin acceptor or bill acceptor) and on-screen calibration.
- SBP — QR-payment provider. Tap to enable QR payments and pick the provider (Shaker or Vendista). With Vendista, configuration is on the terminal side. With Shaker, fill in Point ID, Point secret, cloud cashier ID, and cloud cashier token.
Cash payments: use this section only when a coin or bill acceptor is physically connected. Pick the device type, tap “Device calibration”, then “Instructions”, and follow the on-screen steps — calibration consists of inserting bills (or coins) and entering the denomination of each.
Settings ⚙️ → Additional Modules
Toggle individual hardware modules: cup dispensing, cooling, and boiler. Enable a module here only if the corresponding hardware is physically installed in the machine.
When the cup-dispensing module is enabled, a Cup test button appears on the main Service Menu screen for one-tap test dispenses.
Need help?
If something on your screen doesn’t match this guide, or you’re not sure how to proceed, send a screen photo and a short description to support@ishakerusa.com and we’ll help.